So you’ve followed the guide to integrate Keycloak with Okta via SAML 2.0. The next logical step to simplify that configuration would be to automatically map user groups in Okta (if they should have access to Zerto) to corresponding groups in Keycloak to reduce management even more. Guess what? It’s actually pretty straightforward, and the nice part is I have “RH” to thank for taking what I’ve previously done with user mapping and bringing it to groups; so huge shoutout to him for the assist!
Let’s face it, no one wants to manage application access via users, especially at scale. And no one wants to have another step to take once a user logs into something for the first time. By mapping an Okta group to an existing group in Keycloak this will take any additional administrative work to wait for a user to login, only to get denied access, just so the admin can add them to the group to try again.
Properly managing access to applications shouldn’t be a burden. It should be as seamless and without admin overhead as possible. For example, if I’m defined as a Zerto Admin in Okta, when I first login to Zerto, I want to be let right in with the proper access; not have to bug another admin to add me to a group. What if my group membership needs change? It should be able to be done in Okta and then reflected in Zerto on my next login, so we want to also account for group membership updates without any additional work. The following procedure will be the icing on the cake and make your Keycloak/Okta integration pretty much hands-off once you’ve set it up; and you can go back to doing great things again.
Don’t Jump Ahead!
Before you follow this guide, please make sure you’ve already set up the integration (steps are in my previous blog titled: Zerto 10 Keycloak and Okta SAMLv2.0 Integration. You may have also got to the end of my previous guide and followed the link to this one; so if that’s how you ended up here, then you’re right on track!
Create the Keycloak Groups for Zerto Roles
When Zerto is deployed, there are some out-of-the-box pre-configured roles with the necessary permissions attached to them, so that’ll save you some time. You can view what those roles are and what privileges have been assigned to them in this Zerto document: ZVM Appliance Roles and Permissions
For the most part, these are generally all you need, but just know, that if you want to create any custom roles, you can, and Keycloak already contains the privileges within – so you can use what you need if you have to.
Before you start: If you don’t know how to manage Zerto Role-based Access Controls, please see my previously written blog titled “Zerto 10 Role-based Access Controls” and scroll down to the section titled “Managing Zerto Roles by Using Groups” to create the groups in Keycloak if you haven’t already done that.
Configure the Okta to Keycloak Group Mapping
The first thing you want to do here is make sure you’ve already created the groups you need in Okta and added users to that/those group(s). Once you’ve done that, go to the Zerto SAML application you created for the SAML 2.0 provider in Keycloak.
Create the Group Attribute Statement in Okta
When you get to the app:
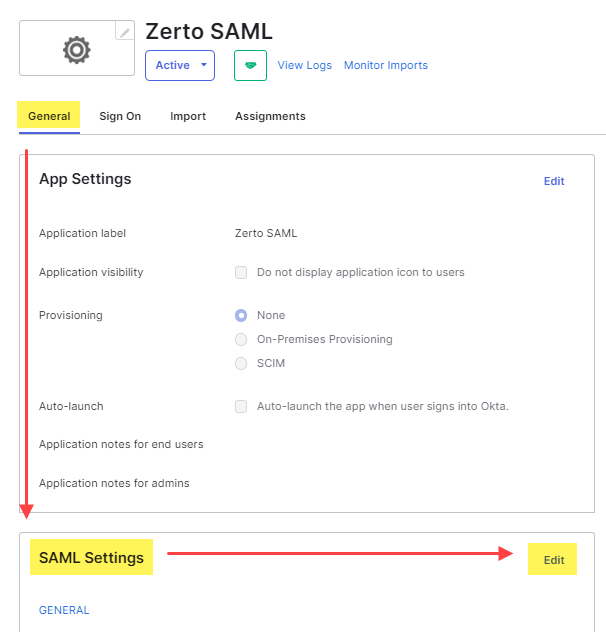
Click on the General tab, then scroll down to the SAML Settings area, and click Edit.
Under General settings, click Next.
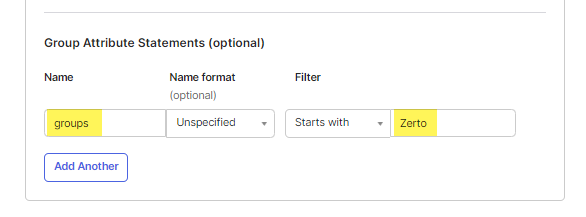
Scroll down to Group Attribute Statements and for the name, type groups.
For the Filter, select starts with and enter the prefix for all groups related to Zerto. In my example, I have two groups; one for admins called ZertoAdmins, and one for viewers (read-only) named ZertoReadOnly.
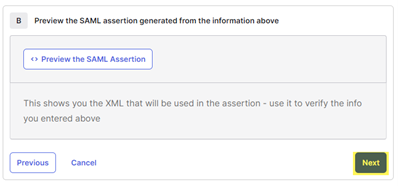
Click Next, then on the next page, click Finish
Now switch over to Keycloak.
Create the Group Mapper in Keycloak
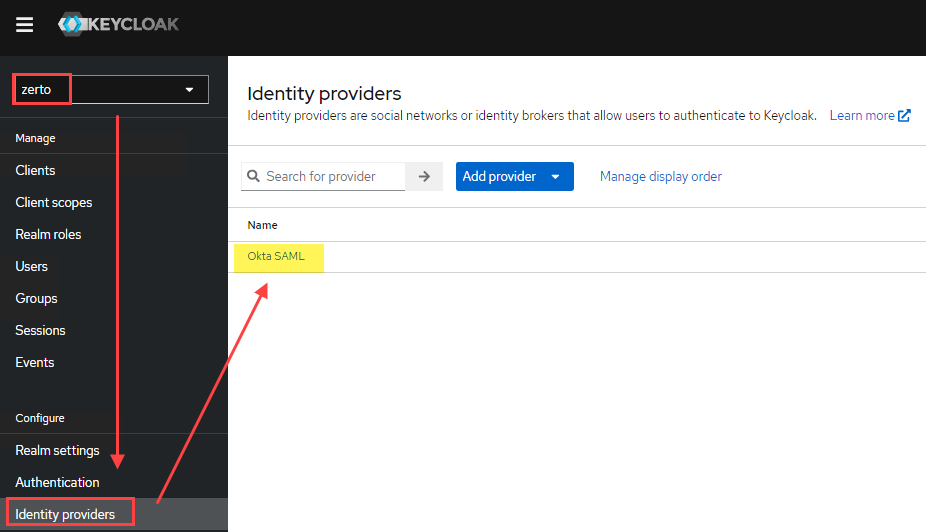
Log into Keycloak, switch to the Zerto realm.
Click on Identity Providers, then click on your Okta SAML provider.
Click on the Mappers tab at the top.
Click Add Mapper.
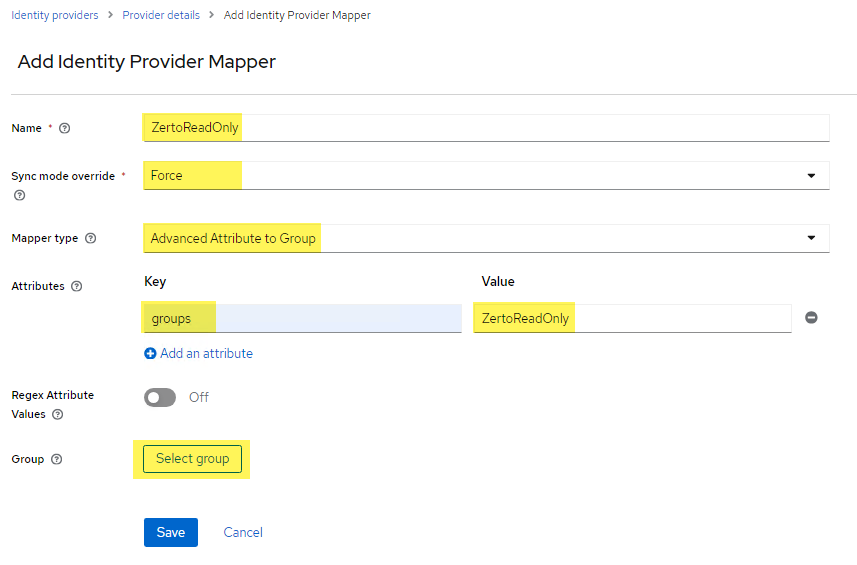
Provide a name to identify the mapper (i.e. ZertoAdmins, or ZertoReadOnly)
Select Force as the sync mode override. This will force an update to group membership if one was made in Okta (i.e. moving a user from the ZertoReadOnly group into the ZertoAdmins group).
Select Advanced Attribute to Group as the Mapper Type
Type in the key for the attribute (this is the “name” in the group attribute statement from Okta). This is typically “groups” without the quotes.
For the Value, input the actual name of the group in Okta (i.e. ZertoReadOnly).
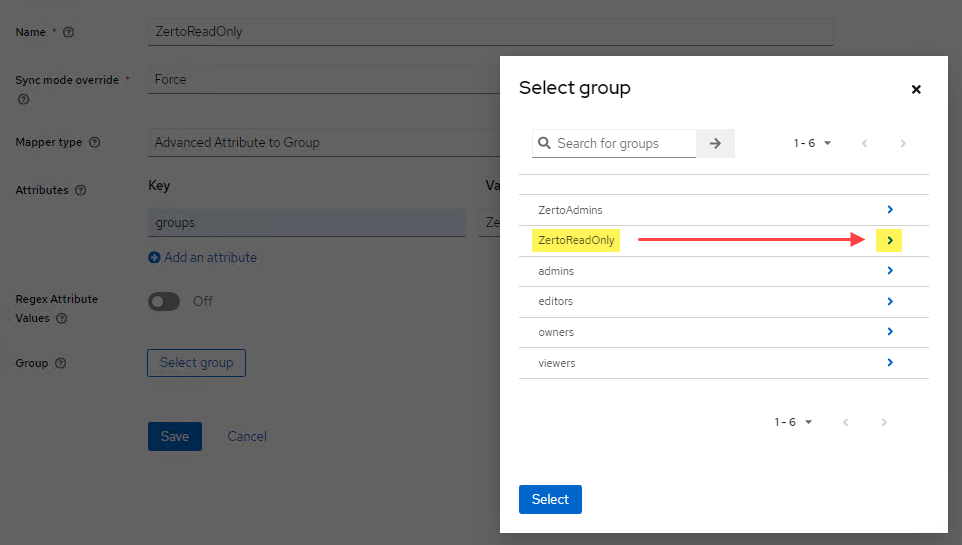
Click Select group
Find the group in the list, click the arrow to the right, the click the Select button.
Click Save.
Now try logging in to Zerto.
Conclusion and Troubleshooting
After you’ve completed this step to map groups from Okta into Keycloak automatically, Keycloak will look for group memberships in the claims that come through with the login request. If Keycloak sees a match based on the mappers you have set up, then the user will automatically be assigned to the right group/role in Zerto and be allowed access.
Troubleshooting Note: Make sure when you created the group in Keycloak that you have added the necessary role to the group, because if the group isn't assigned to any Zerto role, then on login that user will get kicked back to the Okta login page.
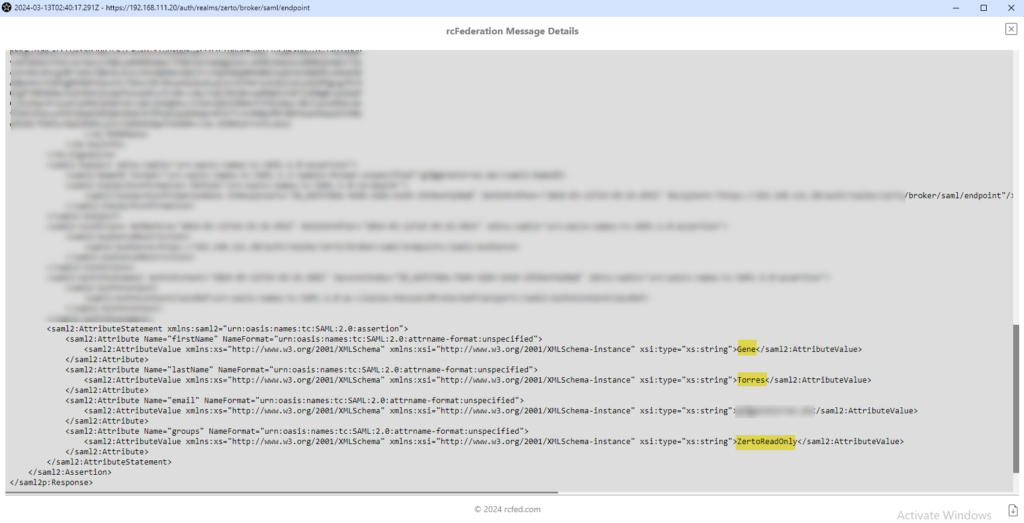
rcFederation Tracer: If you’re setting this up for the first time and want to see what claims are coming through on your requests (again, thanks for the recommendation on this utility, RH!), take a look at SAML, WS-federation and OAuth tracer (installs as a browser add-in) to be able to see what is in your web requests as the communication between Keycloak and Okta take place.
Here’s an example of seeing the attributes Okta passes over to Keycloak on authentication:
Well, I hope this was helpful, and as always, if you have questions or comments, I’d love to hear your feedback. Please also share this with anyone who may find it useful.
Did you know that when the Linux-based Zerto Virtual Manager Appliance (ZVMA) was released, the way Zerto handled permissions has completely changed, giving you more control over who has access and what type of access they have?
In the old days (like a year ago, and to some still currently on the Windows-based ZVM), Zerto permissions were really an extension of vSphere permissions. When Zerto got installed on a Windows VM, part of that installation process created roles and permissions within vCenter that you could use to grant users access to certain Zerto functionality, if not all functionality. This was because Zerto mainly relied on whether or not you or any user trying to get into Zerto had an account with access to vCenter. For those who knew about it and used it, it worked, however, it left much more to be desired, like true RBAC and eliminating the possibility for any old vSphere Admin to have complete control over Zerto.
Today, as of the Zerto 9.7 Linux appliance and into 10, managing access in to Zerto has been decoupled from vSphere permissions and brought into Zerto through Keycloak, not to only provide RBAC, but to also provide an additional layer of security and more integration options for access management. Now the only connection into vSphere is a service account, and all user access into Zerto is based on having access granted through Keycloak.
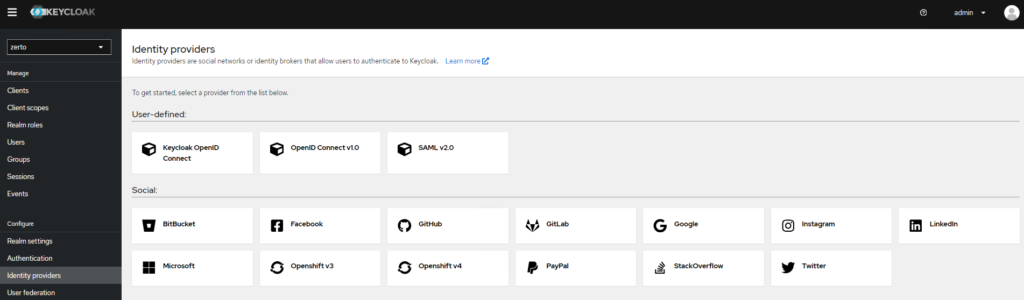
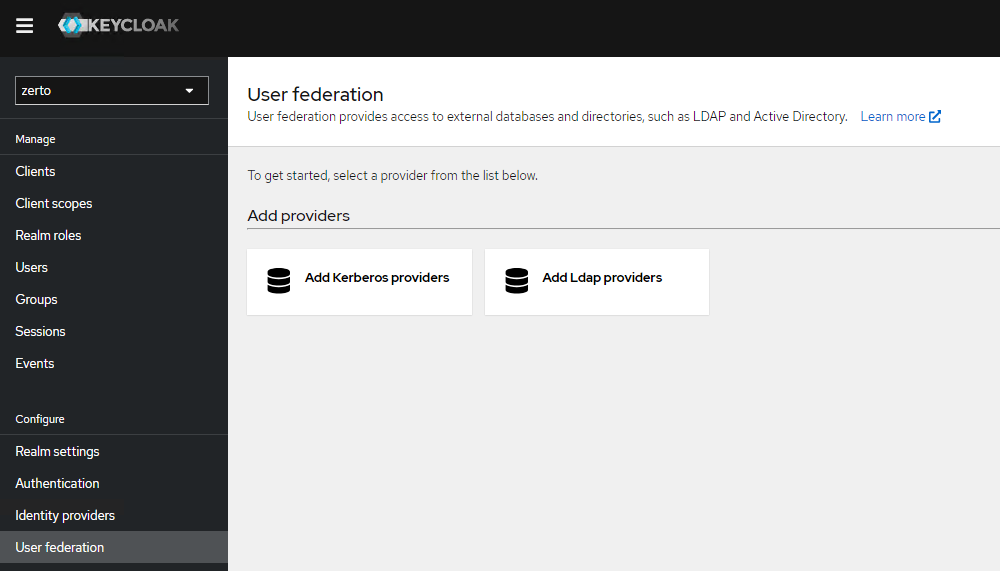
Identity Provider Options
When you take a look at what type of integrations are available with Keycloak, it can be a little overwhelming, however, as long as it has what you need, you likely won’t care for what else is there, right? There are currently 18 built-in options for identity providers and user federation options (pictured below). I’d say there are likely many more when you consider that anything else that can be connected to with OpenID Connect, SAML v2.0, Kerberos, and LDAP/s are also available.
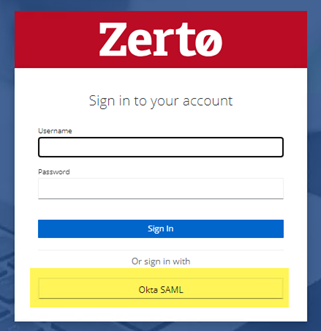
With a plethora of options available, the two most common ones I hear as customer needs today are Okta and Active Directory, and I’ve already published a YouTube video for Active Directory integration via LDAPs, so this update is going to be specific on how to set up Okta integration via SAML v2.0.
The goal here in this post is to list out the order of operations and the steps required to perform so that when you log in to Zerto, instead of pre-creating an account in Keycloak, you’re going to rely on an existing account in Okta that has access to Zerto, with the added benefit of push-button MFA.
Configuration
Procedure Overview
So I’ve tested this with both OpenID Connect, and SAML v2.0 Identity providers, and I’ve come to the conclusion (and verified with some customers I’ve encountered who were also Okta customers) that configuring this integration via SAML v2.0 is much simpler, and doesn’t require banging head on keyboard. Having no prior experience setting this identity provider up took less than an hour from start to finish, so it was extremely simple.
So if you want to do this in one sitting, there are five main steps in the procedure that I counted.. okay, 6 if you want to include deploying the ZVMA and getting it on the network, which I won’t cover here:
Note: Keycloak and Okta have the tendency to automatically log your session out if you leave them idle for too long, so be sure to keep those sessions active while you’re jumping between the two.
Deploy, configure, and license the ZVMA
Configure the SAML 2.0 provider in Keycloak
Create the Okta Application and download the signing certificate
Configure mappers to map user attributes from Okta into Keycloak
Upload and import the Okta signing certificate to the ZVMA and Keycloak trust store
Logging in to Zerto
One thing to note is that when you’re performing steps 2,3, and 4 above, you may want to have both Keycloak and Okta open at the same time, because there are some values that they will be trading back and forth. Having both open allows you to complete them in parallel and make for a smoother experience.
I will also include at the end of this write up a “next steps” optional but recommended step that comes after logging in for the first time, so be sure to read all the way through, because it will be about RBAC assignment to the Okta user that has been logged in.
If you have any questions, please ask them in the comments.
Configure the SAML v2.0 Provider
Log into the Keycloak administrator interface on the target ZVMA via https://[FQDNorIP]/auth (replace [FQDNorIP] with the FQDN or IP address of your ZVMA).
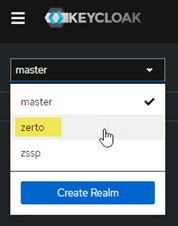
After you’re logged in, you will see a drop-down list at the top left that defaults to “master.” Click there and select zerto from the list to change into the Zerto realm of settings.
In the left navigation bar, under configure, select Identity providers.
From the selection screen, choose SAML v2.0
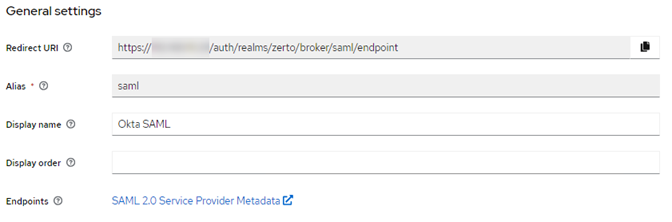
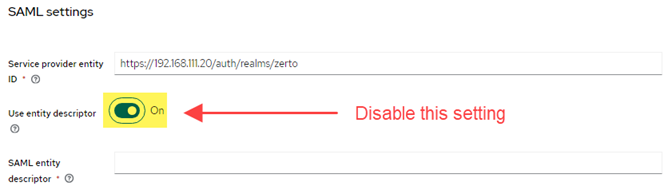
Enter the information as shown in the screenshot below, and note that you cannot change the Redirect URI, however, you will need this when configuring the Okta app, so copy it and have it ready to go when you get to the Okta configuration portion below.
In the SAML Settings area, disable the setting labeled “Use entity descriptor.” Once disabled, more fields will appear below in the SAML settings.
Before filling anything out further, open another browser window and log in to the Okta admin site to create an app for Zerto, because now you’re going to need to gather/enter URIs in both Keycloak and Okta.
Create and Configure the Okta Application and Download the Signing Certificate
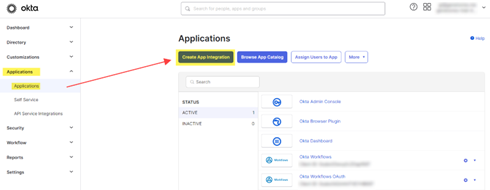
In the Okta admin, expand Applications in the left navigation bar, and select Applications from the nested options.
Click on Create App Integration
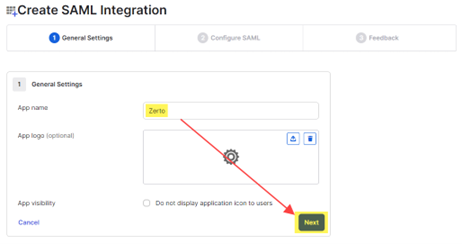
For the name, enter Zerto SAML, then click Next.
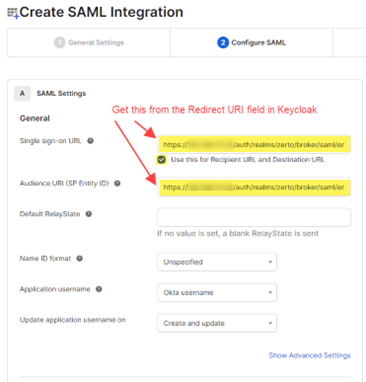
Under General, where it asks for the Single sign-on URL, enter the Redirect URI that was automatically created in Keycloak. Refer to step 5 above where you started setting up the SAML v2.0 provider in Keycloak.
Enable the ckeckbox labeled “Use this for Recipient URL and Destination URL.”
Leave everything else as default, then scroll down and click Next.
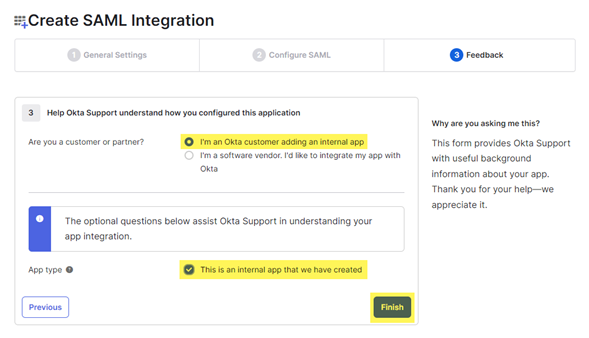
The next page is for feedback, so select the following options and click Finish. You will be returned to the applications page.
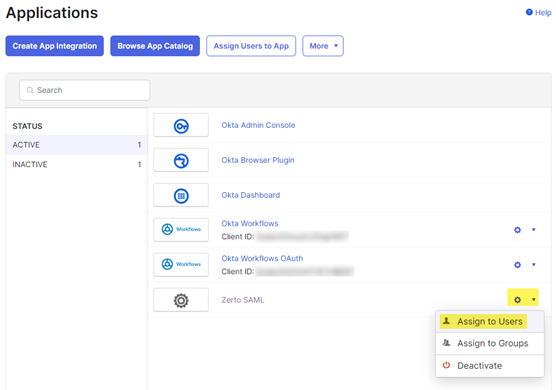
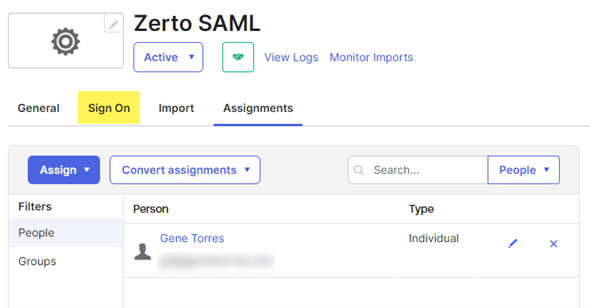
On the applications page, click the gear icon to the right of the Zerto SAML app you just created, and select Assign to Users.
For each user that requires access to Zerto, click the Assign link to the right of their name to add them to the app. Without assigning them, they won’t be able to login to Zerto using their Okta account. Optionally, you can create a group in Okta and assign your users to that instead of individually here.
When you click on Assign, another box will pop up with the user name in the box. Click Assign and go back to be returned to the main list of users. If there are more users to add, repeat the previous step, otherwise, you can close the window with the list of users.
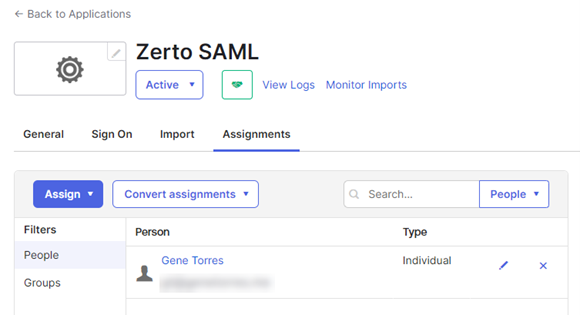
Back on the applications page, if you click on the app, you will see your added users/groups in the list.
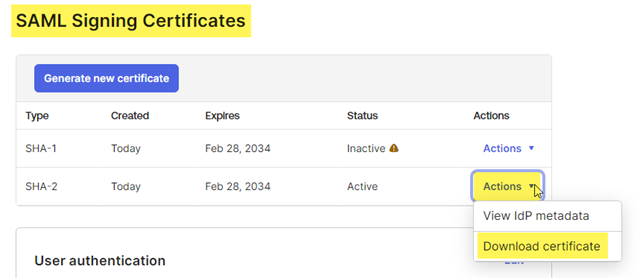
Now, download the signing certificate. Click on the Sign On tab at the top.
Scroll down to the SAML Signing Certificates section and find the active certificate. At the right of that active certificate, select Actions > Download Certificate. This is what you will be uploading to the ZVMA and importing to Keycloak, so keep track of it. Save the certificate as a .cert file (which should be what it defaults to).
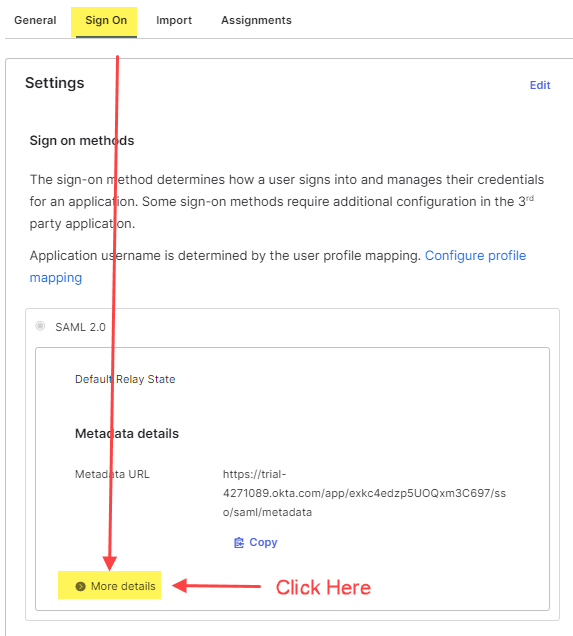
Now you need to get a couple of URLs from Okta to use in Keycloak. Click on the Sign On tab for the Okta application.
Scroll down to the SAML 2.0 section. Beneath the Metadata details header, click on the link that says more details.
Copy the Sign on URL and the Sign Out URL
Now return to Keycloak to continue the SAML v2.0 provider configuration.
Return to Keycloak
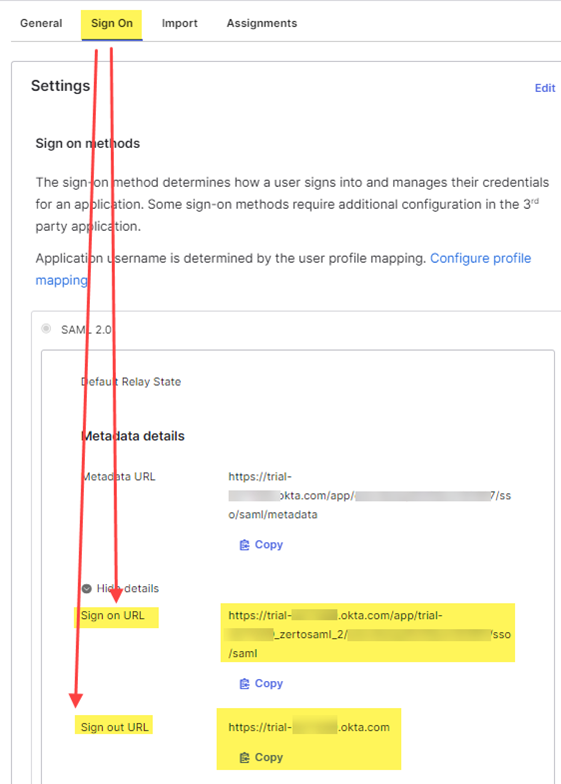
In the SAML Settings section of the SAML v2.0 provider you’re configuring in Keycloak, find the Single Sign On Service URL field and enter the Sign on URL that you copied from Okta in the previous step.
For the Single Logout Service URL, past the Sign Out URL you copied from Okta in the previous step. When done, it will look similar to the image below:
Leave all other fields as default. Click Save.
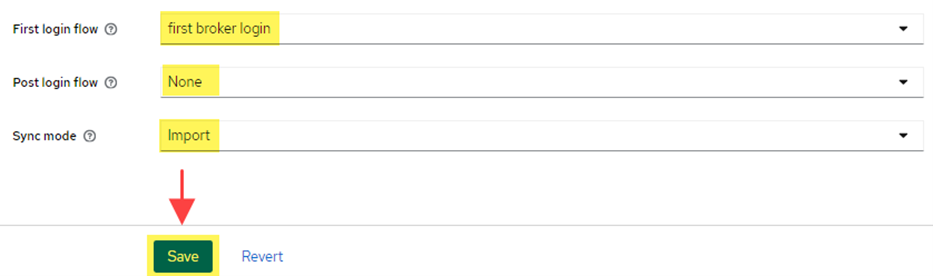
Scroll down to the Advanced Settings and verify the following settings:
First login flow: first broker login
Post login flow: none
Sync mode: Import
Click Save.
Configure Mappers for Attribute Import From Okta to Keycloak on Login
Mappers will be used between Okta and Keycloak to easily import user attributes on login to Zerto. If you do not provide mappers, then on first login, the user will be prompted to enter their e-mail address, first name, and last name. The idea with configuring mappers is to bring those attributes over from Okta to populate the fields in Keycloak for the user automatically, so the login is much more seamless.
First we will configure the attribute mapping in Okta, followed by the mapper configurations in Keycloak.
Okta Mapper/Attribute Configuration
Log onto the Okta administration page.
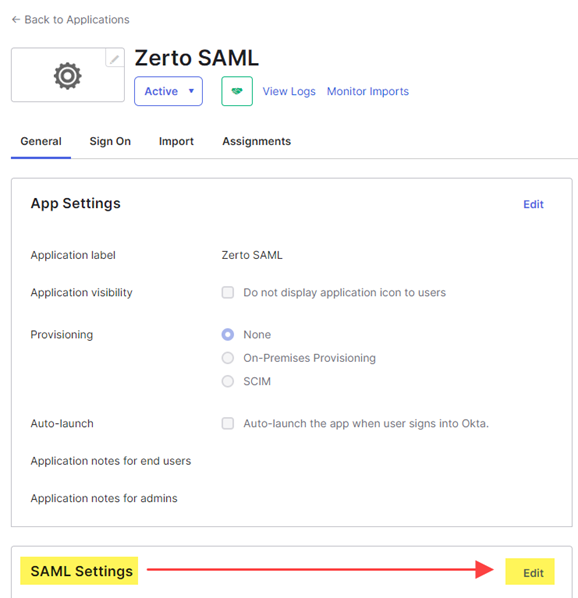
Go to the SAML Application that you previously configured in Okta (probably named Zerto SAML).
On the General tab of the application, scroll down to the section labeled SAML Settings and click Edit.
Click Next.
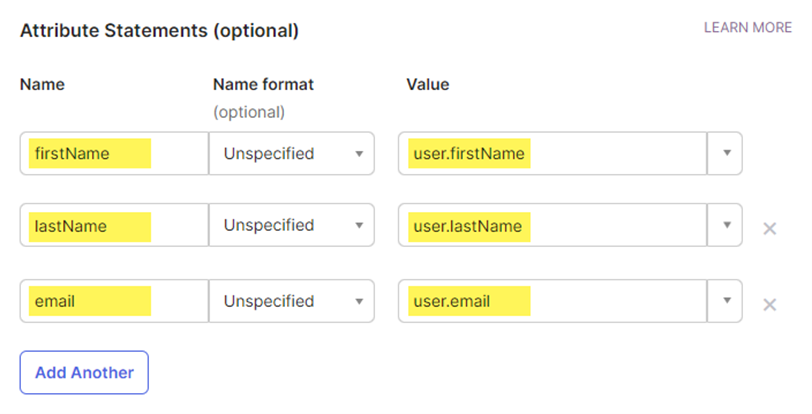
On the Configure SAML step, scroll down to the Attribute Statements section and add the following attributes. These will map Okta user attributes to Keycloak user attributes for simpler login as mentioned above.
Scroll down and click Next.
Click Finish.
Keycloak Mapper Configuration
Configure the Mappers for users’ e-mail, first name, and last name in Keycloak to be brought over to their Keycloak account automatically on login.
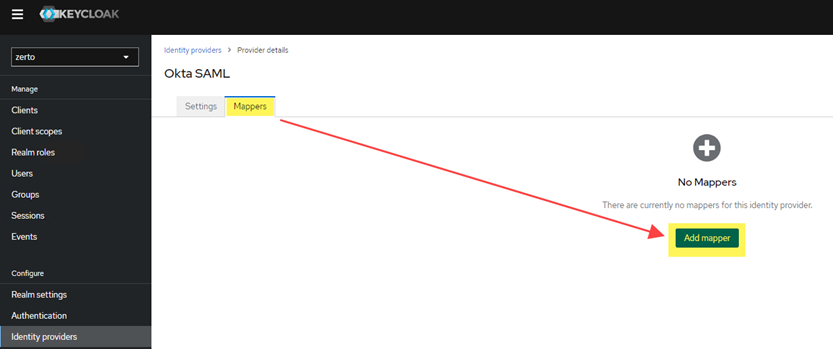
In Keycloak, click on the Okta SAML provider you configured.
Click the Mappers tab at the top, then click Add Mapper.
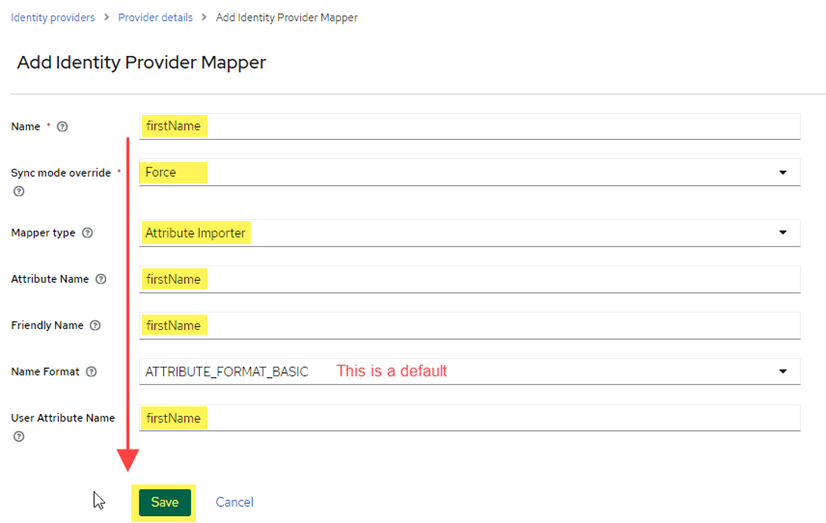
Add the mapper for the user’s first name. Complete the fields as shown in the image below, then click Save.
Go back to the Mappers tab, and add another mapper for the user’s last name this time (see image below for values to use). Click Save.
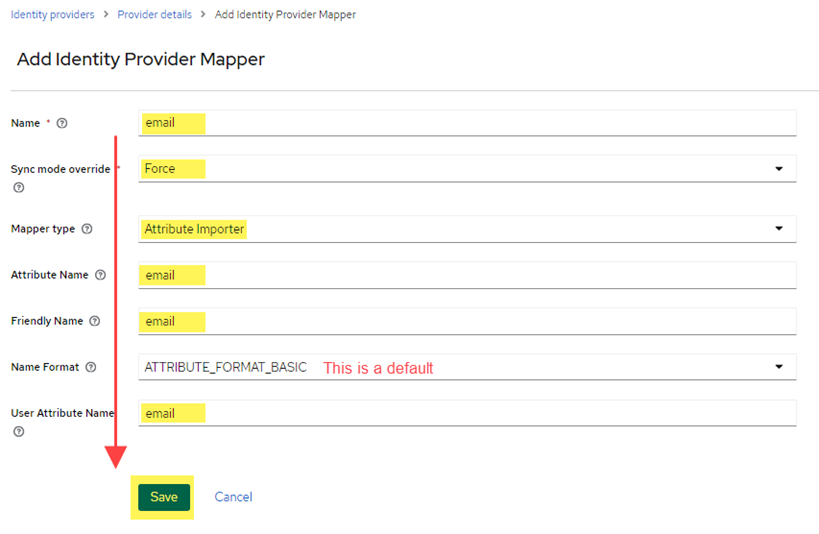
Go back to the Mappers tab, and add another mapper for the user’s e-mail address this time (see image for values to use). Click Save.
Upload and Import the Okta Signing Certificate to the ZVMA and Keycloak Trust Store
Update: I decided to include the certificate import steps here, but left the link to the original Zerto documentation as others have been asking for it and felt this would be more “complete” with it inline.
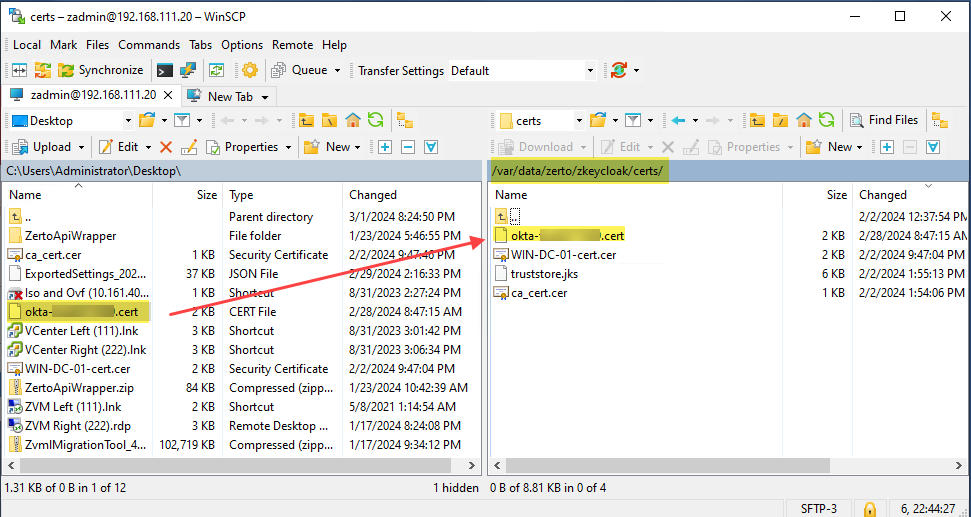
Upload the Okta certificate to the ZVMA. Put the file in the following location: /var/data/zerto/zkeycloak/certs/
Use PuTTy or other SSH client to log onto the ZVMA. If you are doing this via the vSphere console, select 0 from the appliance manager menu to exit to the shell.
Run the following command to add the certificate to Keycloak’s trust store:
You will be prompted to enter the keystore password. Use the password below. If for some reason you are asked to change that password, use the same one, don’t change it.
truststorepass
When prompted to trust the certificate type yes and press enter.
Finally, fun the following command to kill the current pod and run the updated one with the certificate in place
kubectl delete pod zkeycloak-0
You can now end your SSH session and start logging in to Zerto via the Okta SAML login method.
Original Zerto documentation for importing certificates into Keycloak’s truststore:
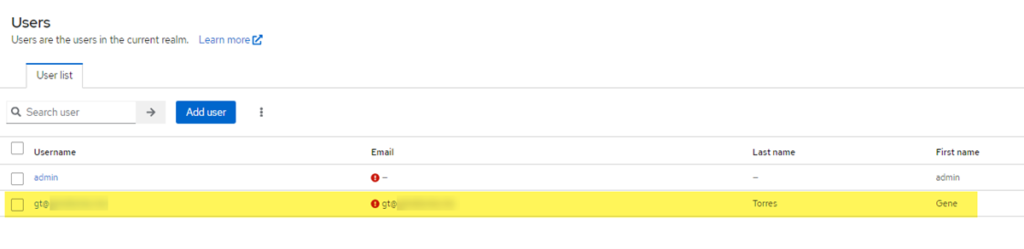
After you’ve completed all the steps previous to this section, you can start logging in to Zerto. One thing to note is that when you login via your Okta credentials, the user loggig in (if given access to the Zerto SAML app via Okta) will be logged into Zerto, and if you look in the Users section of the Keycloak Zerto realm, there will also be an account created in there for the user.
By default, the user being given access through this method will have admin rights to Zerto. If you would like to minimize permissions or access into Zerto with, for example, read-only access, you can visit the following URL where I have previously wrote about how the Role-based Access Controls work within Zerto. Optionally, you can import group attributes from Okta the same way you mapped user attributes, however, that is out of scope here.
That’s all I’ve got for this time. I hope you’ve found this useful and if so, please share it with others who you feel will find it useful as well. For any questions, please leave a comment!
Update: Mapping Okta Groups to Keycloak Groups
After you’ve gone through this, you’re probably wondering how you can also automatically map Okta groups into Keycloak for Zerto access. Please see my follow-up blog post on Mapping Okta Groups to Keycloak (SAML 2.0) to continue from here and get your groups mapped over automatically. By doing this, you will avoid having to add users to Keycloak groups after their first login.
If you’re still on Zerto 9.7 or lower on the Windows Zerto Virtual Manager and have been asking for better role-based access controls (RBAC) for Zerto, then you need to get migrated over to the new Zerto Virtual Manager Appliance (ZVMA)!
About the Zerto Virtual Manager Appliance
The Linux-based Zerto Virtual Manager Appliance (ZVMA) made its debut in Zerto 9.5, and has since become the standard going forward with Zerto, as the last Windows version (of the ZVM) was 9.7. In Zerto 10, there is no Windows ZVM, so migration is now on the table and I’d highly recommend going that route to to prevent being left behind (and I will go more into detail about that in another blog post).
In addition to the underlying OS changing, came a modernization of how the ZVM has been architected. Instead of running everything as a single (or maybe a few) Windows services, Zerto has been built to run as containers on top of MicroK8s on a hardened Debian 11 virtual appliance. Please also note that because it’s Debian 11, the minimum vSphere version that supports it is vSphere 7.x.
That said – there is no separate software package to download and install; the ZVMA is now a fully-packaged OVF that you just deploy in vSphere. The best part is once it’s deployed, you’re ready to use it. This fundamental change on how Zerto has been built also introduced the ability to provide more frequent updates (quarterly) and virtually no disruption as each container can be updated independently without having to disrupt the entire functionality of the ZVM.
Now back to why you’re here…
While in the older versions of Zerto, there were some basic role-based access controls, they relied on vSphere roles, which meant that anyone who needed to log into Zerto would need to have credentials to log onto the vCenter client. This has all changed once you’ve entered the world of the Linux ZVM.
Instead of relying on vSphere permissions for each user, Zerto now has it’s own authentication services built on Keycloak (https://www.keycloak.org/), which provides you with a more secure posture when it comes to safeguarding your ability to recover from something as disruptive as a ransomware attack.
By removing the reliance on vSphere logins (which have typically been integrated to Active Directory), the chances of an elevated AD account becoming compromised will not affect Zerto’s operation because there is no dependency on those logins to get into Zerto. Not even the service account Zerto uses to manage API calls to vCenter can affect Zerto, because it’s not even managed by Zerto. While we’re on that subject, the ZVMA also supports MFA for added security. Additionally, you get to keep tighter grips on who actually has access and can log into vSphere while making sure your recovery environment stays protected/isolated.
Configure Role-based Access Controls in Zerto 10
In this section, I’ll cover what the role-based access controls looks like, what roles and permissions are involved, and how to set a user up and grant the correct roles, because when I first went through this, I didn’t find it as intuitive; so hopefully this helps if anyone reading finds themselves in a similar situation.
Note that before doing this, the assumption is that you’re already familiar with deploying the Linux Zerto Virtual Manager (OVF deployment via vCenter) and have already gone through and changed default passwords as well as paired to your vCenter. If you haven’t done that and need the information to do so, visit https://help.zerto.com for the deployment guide.
Also, this is not the guide for configuring Keycloak for any other integration such as Active Directory or Okta, for example. This is simply using accounts local to the ZVMA (in Keycloak). For other supported integration, visit the Zerto documentation at: https://help.zerto.com
Enable Roles and Permissions
Once you’ve completed the pre-requisite steps above, log onto the Zerto Management page at https://[yourZVMAIPAddress]/management. You must do this in order to leverage the Zerto Roles and Permissions through Keycloak.
In the management interface, click on Security & RBAC on the left navigation bar.
Enable the radio button for “No Access” under Roles & Permissions
Create a Keycloak User and Configure Permissions
Log onto the Keycloak administration UI at https://[yourZVMAIPAddress]/auth.
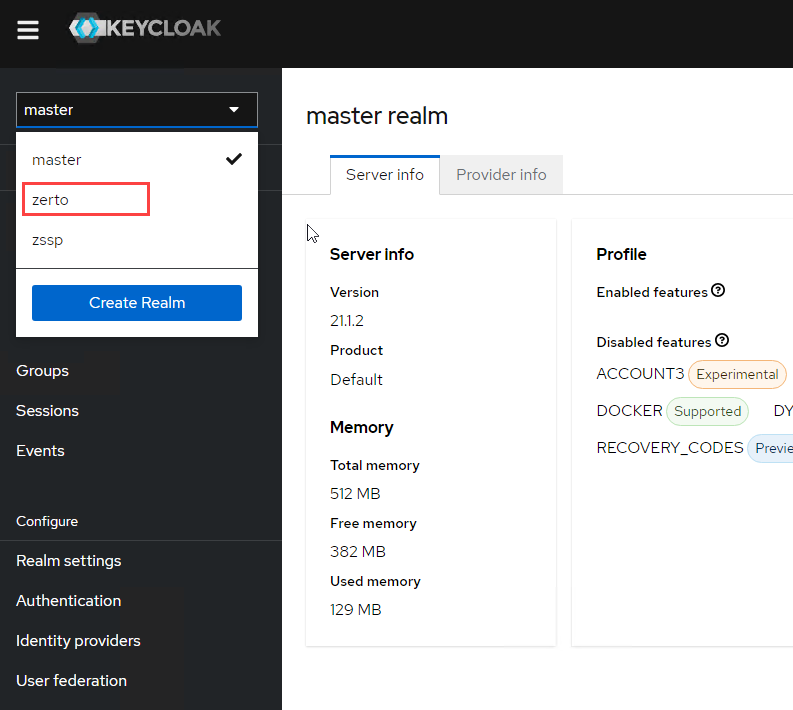
Once logged in, click on the realm dropdown menu and switch from master to zerto.
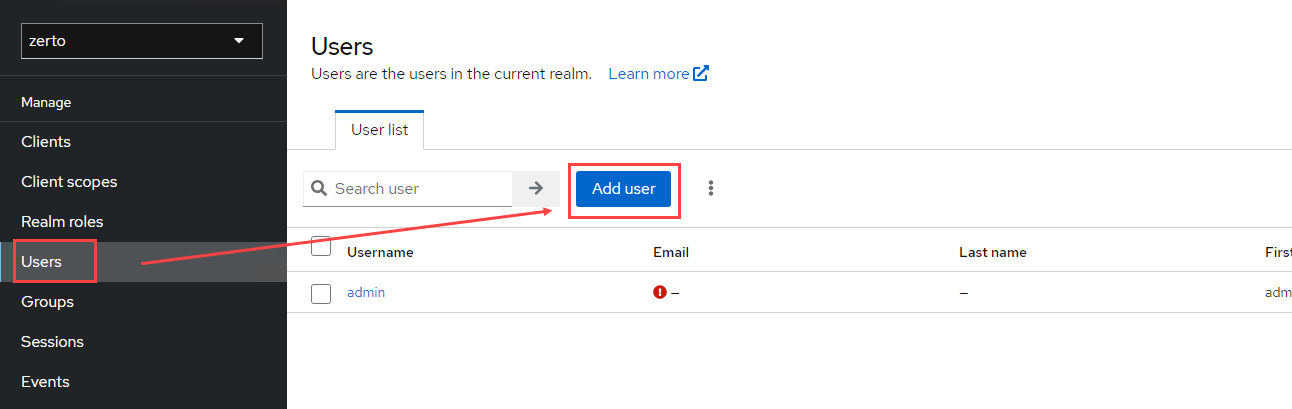
Click on Users on the left navigation bar, and then click the Add user button.
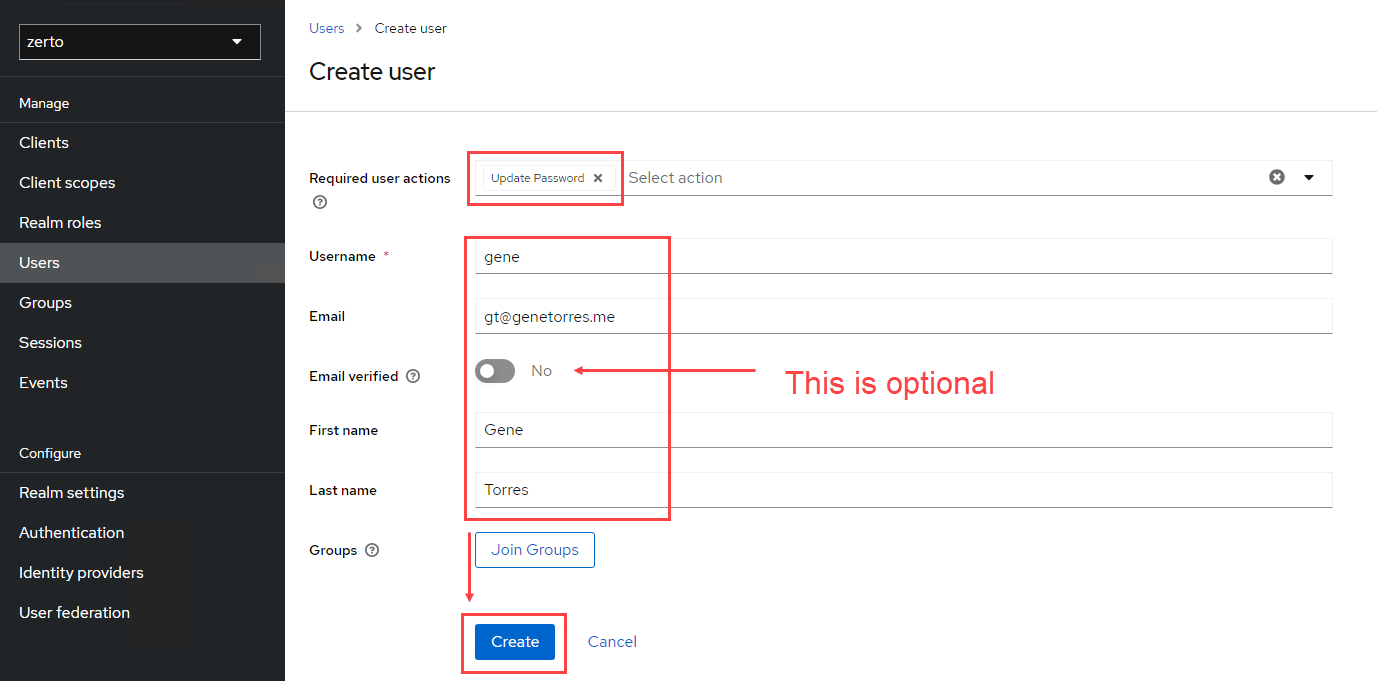
In the create user window, set actions as needed, such as update password (change password upon initial logon) or any other options you require. Click Create when done.
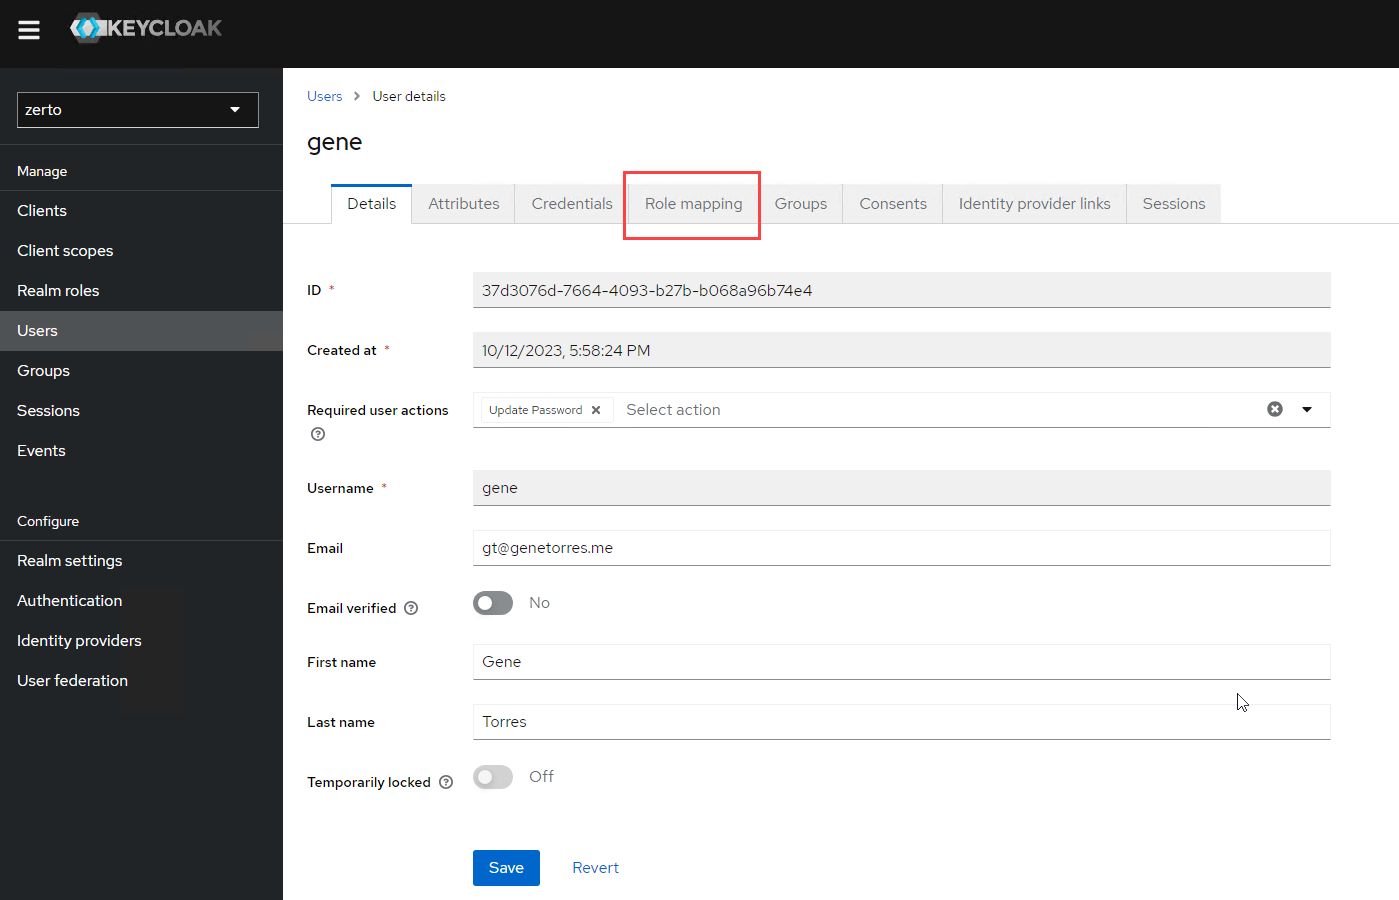
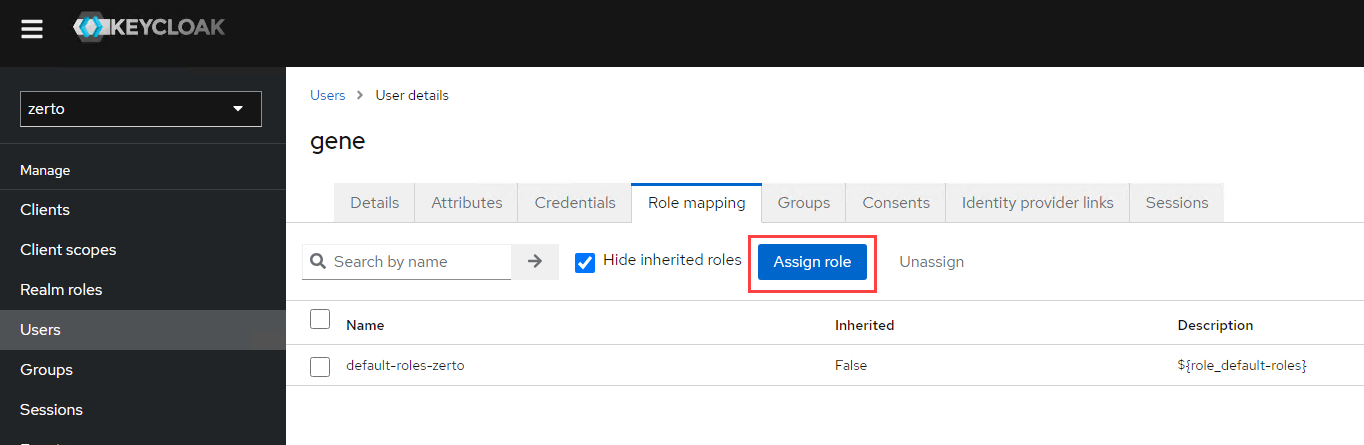
You should now see the user details and several tabs across the top. Click on Role mapping.
Click the Assign role button
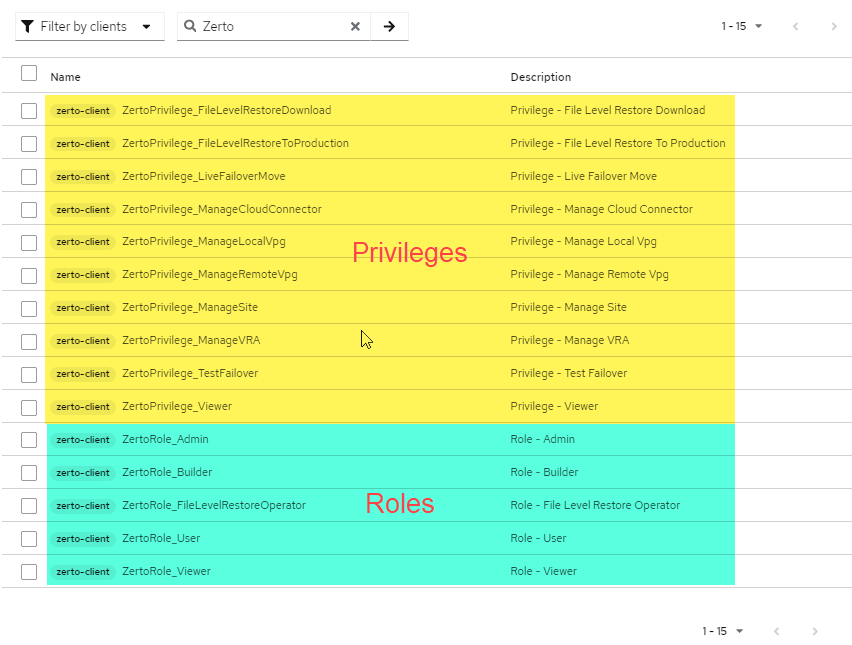
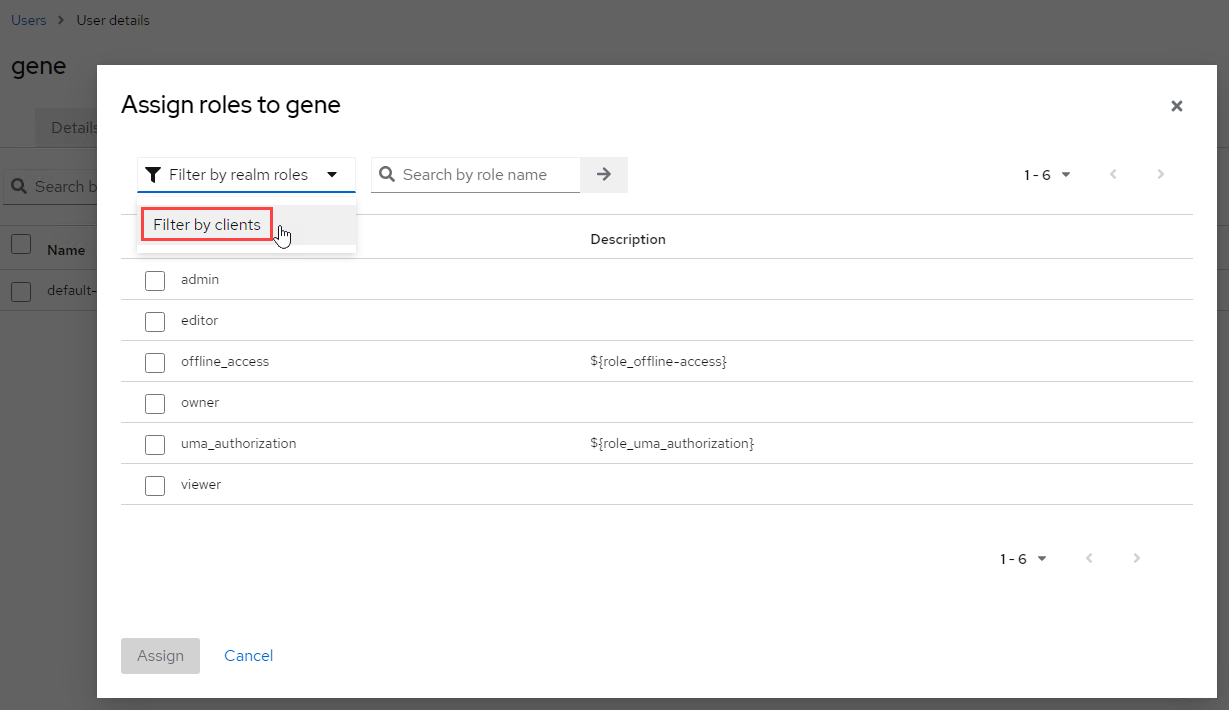
At first glance, don’t worry if you don’t see any Zerto roles. (This is what got me and wasn’t clearly identified in the documentation). Click on the filter dropdown menu on the top left, and select Filter by clients.
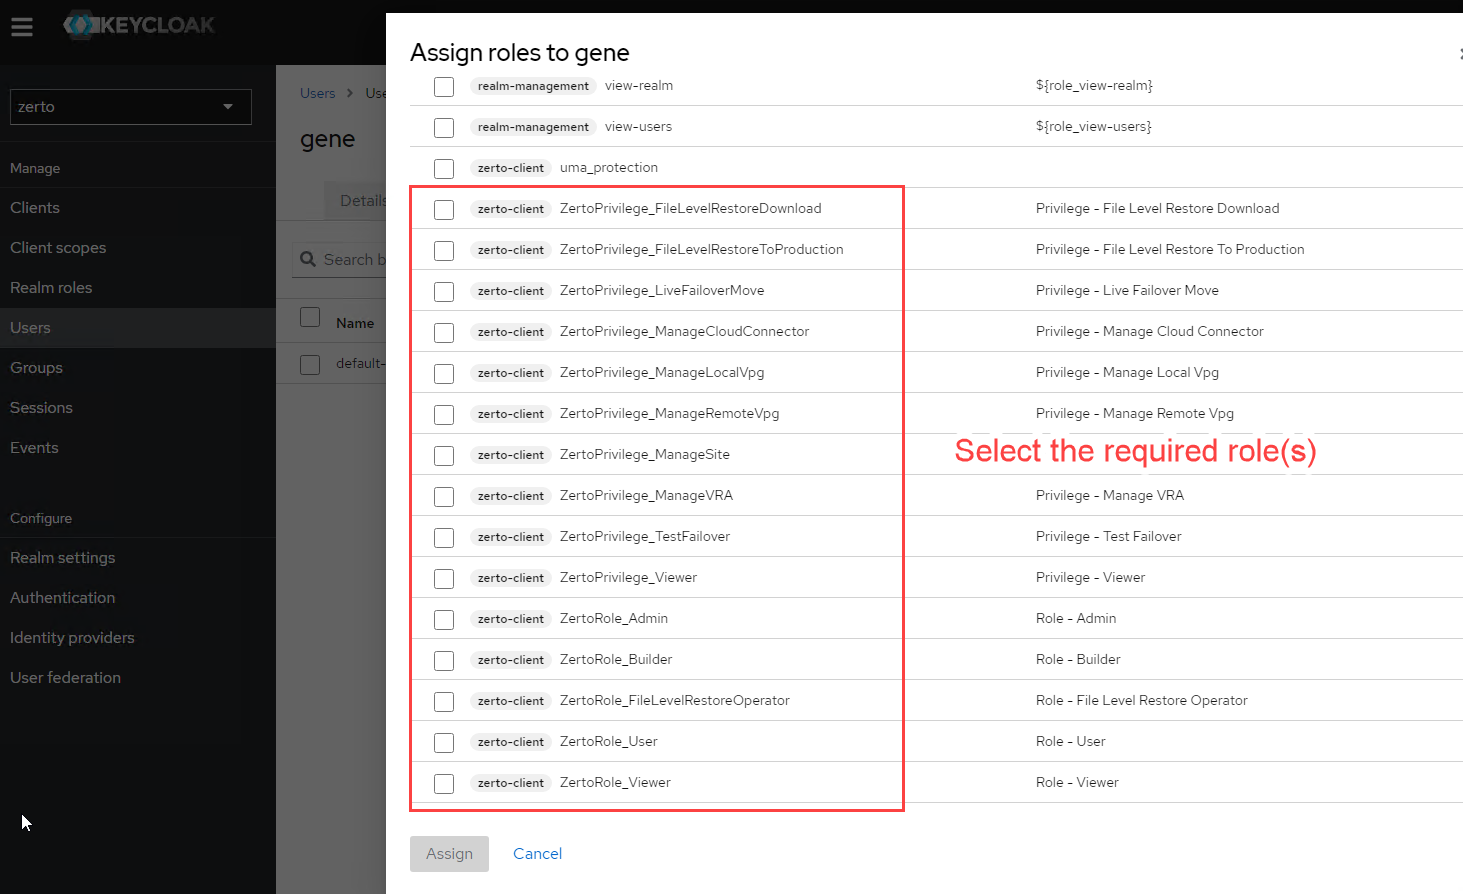
You will now see a full list and a section tagged zerto-client. From that section, select the required roles for your user, and click the Assign button at the bottom.
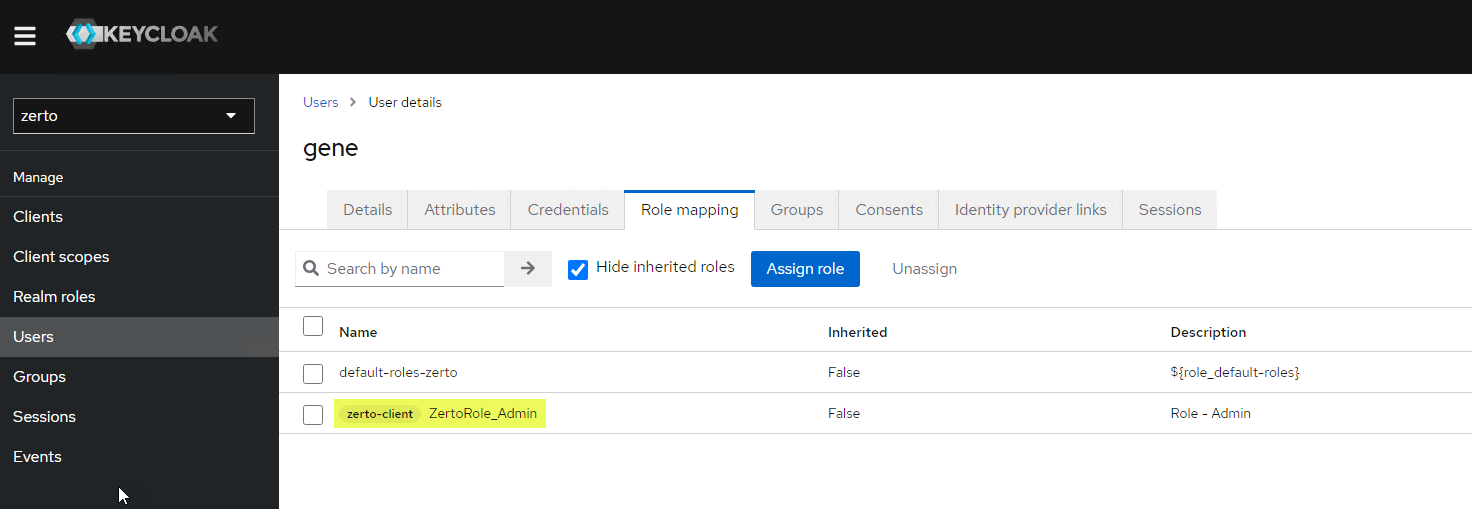
You will now see the role(s) assigned to the user.
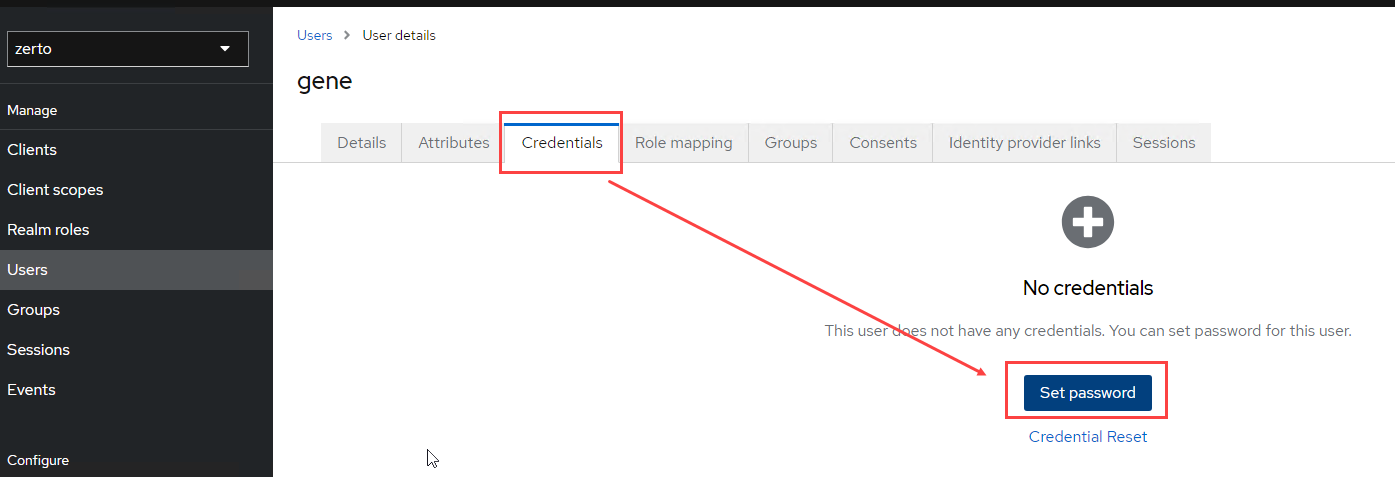
Finally, before the user can try logging in, click on the Credentials tab at the top, and set the password.
Managing Zerto Roles by Using Groups
Maybe you don’t want to manage roles and permissions on a per-user basis, especially at scale. Besides, it’s a best practice to use groups for role management so you can simply add users to them down the road without having to repeat the steps above for each user.
So, if your preferred method to manage roles is by group, you can skip the steps above, and follow these steps and be on your way. Just remember, when you set users up, you still have to set the initial password and other options before they can login.
If you’re not already logged into Keycloak, login at https://[yourZVMAIPAddress]/auth.
Change from the master realm (dropdown on the top left) to the zerto realm.
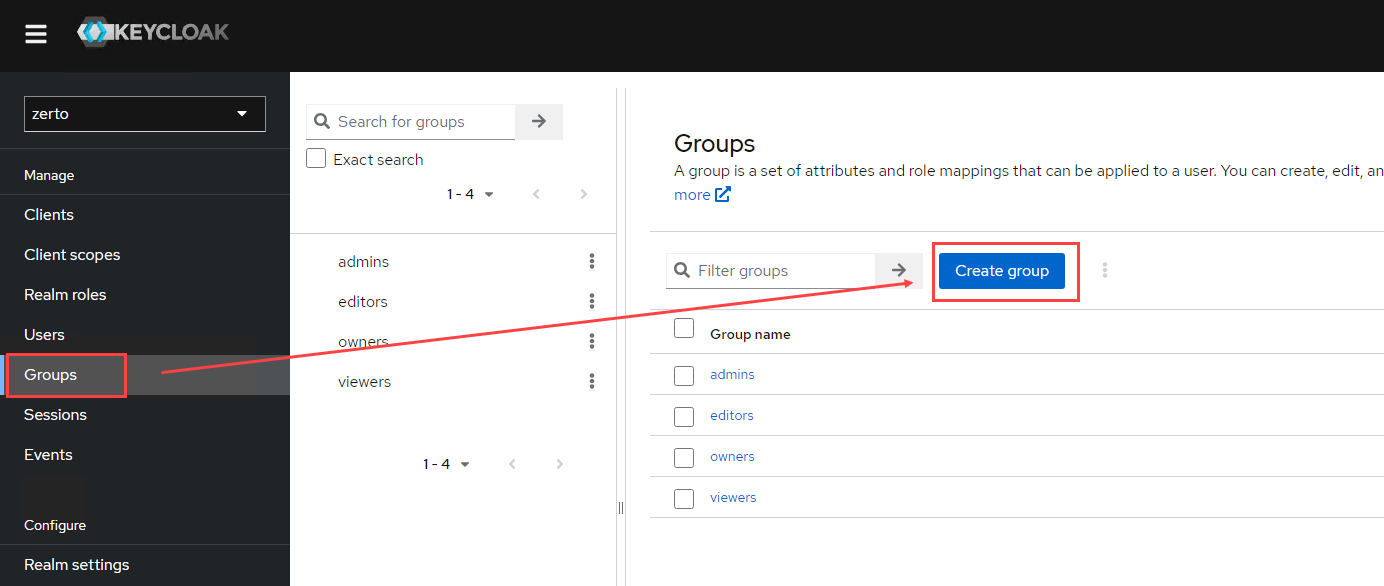
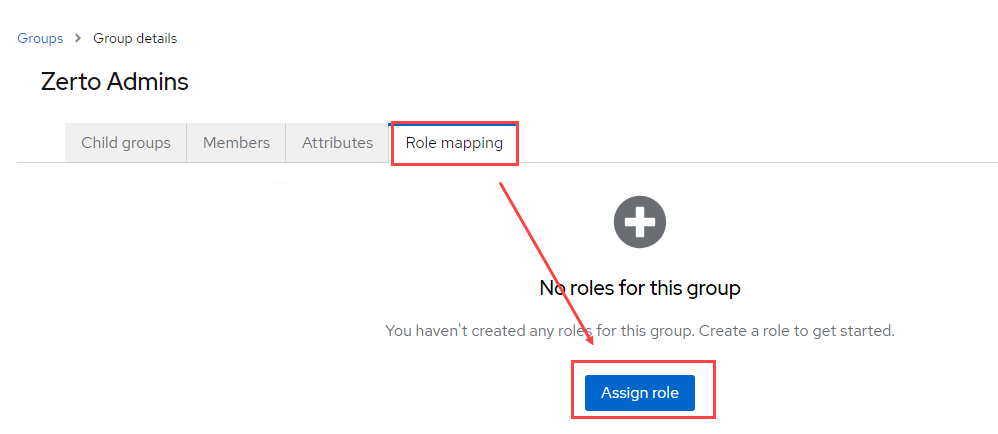
Click on Groups under the Manage section on the left
Click the Create group button.
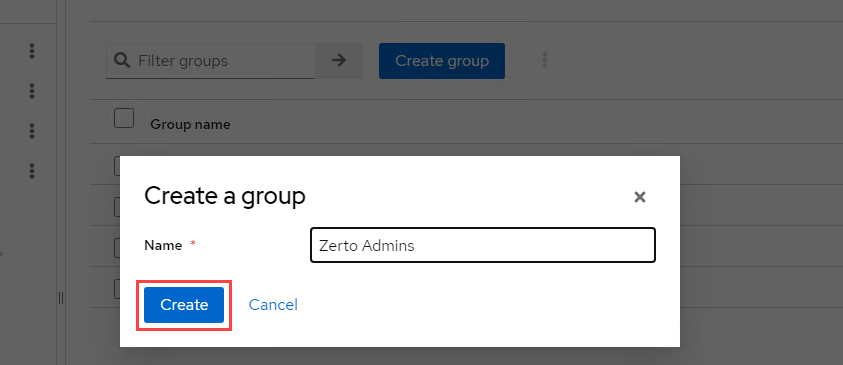
Provide a name for your group and click Create
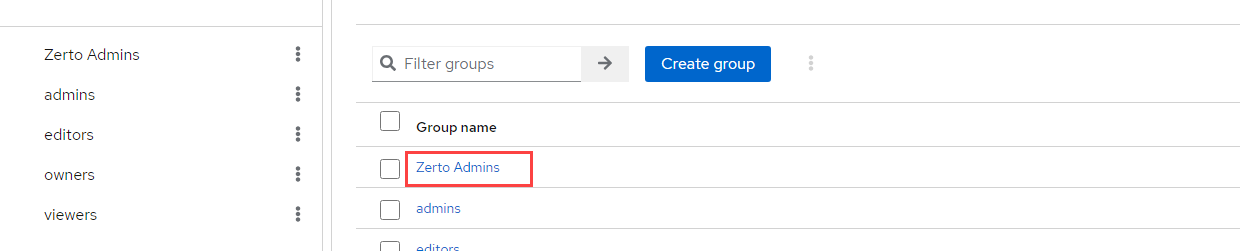
Click on the group you just created.
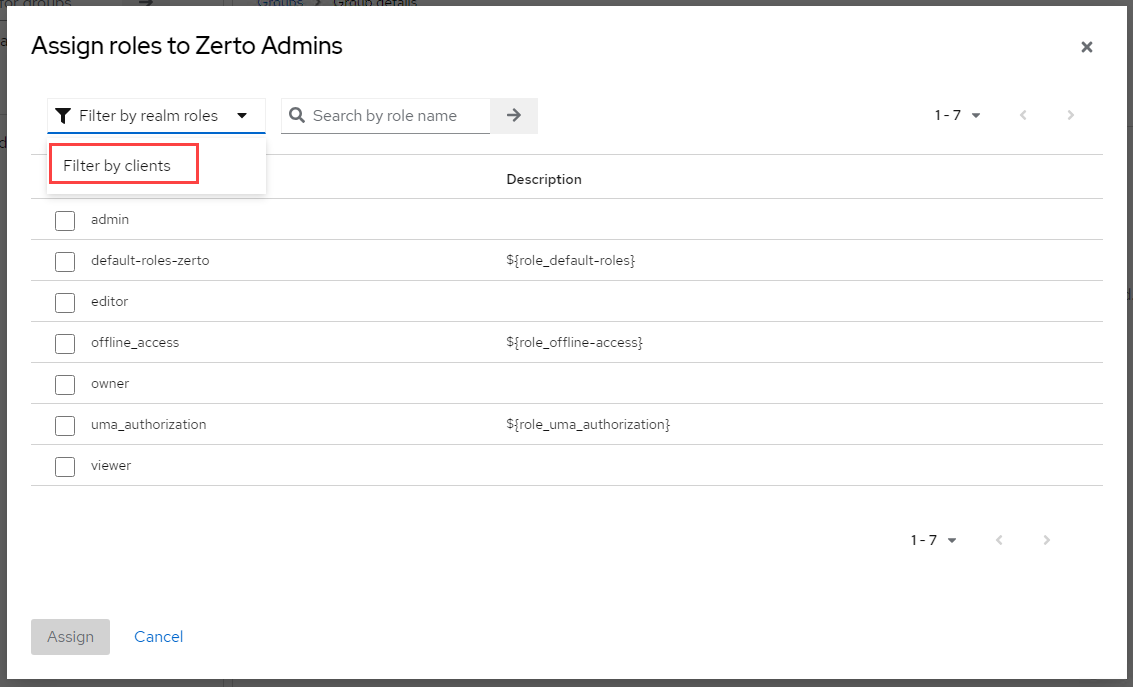
Click on the Role mapping tab at the top, and click Assign Role
Click on the filter dropdown and select Filter by clients.
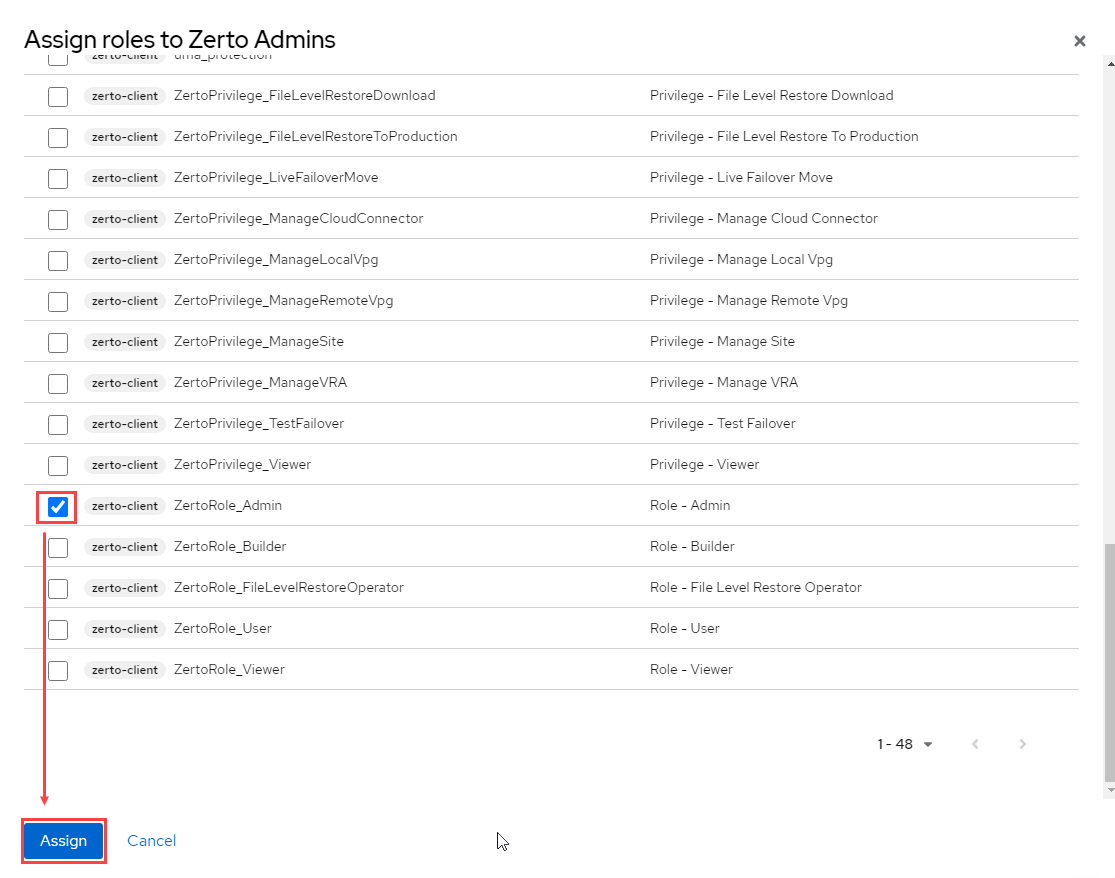
Scroll down the list to the area tagged zerto-client and select the role(s) you wish to apply to the group you just created. When done, click Assign.
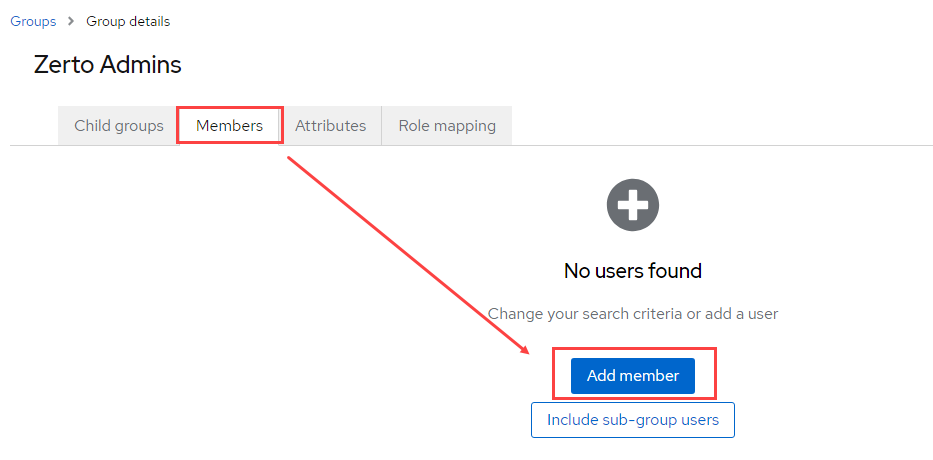
Now, add members to the group (if you have previously created users – otherwise, create users and then add them to the group). Click on the Members tab, and click Add member.
Select the users to add to the group as members, and click the Add button to finish.
Summary
Managing Zerto users in Zerto 10 via Keycloak doesn’t have to be difficult. It’s quite easy, actually, especially when assigning roles at the group level. By assigning different roles to different users depending on what they need access to be able to do, you’re not only exercising better access controls with Zerto, but you are also providing better security, able to create responsibilities for others without giving them any vSphere permissions, and also reducing your own operational/administrative overhead.
Now the question is whether or not to integrate with Active Directory – that is totally up to you. I’m going to leave you with this piece of advice though. Zerto 10 was built with Keycloak to isolate authentication and provide better security when it comes to recovering from cyberthreats. By choosing not to integrate with AD, there is no other way for bad actors to access Zerto, therefore giving you a better chance at quickly turning the tables on them and recovering to a point in time before any malware/ransomware took over. Zerto 10 also introduced in-line encryption detection, so your protected workloads will have a built-in early warning system, so you’ll be able to not only react faster, but be notified before all hell breaks loose.
Let me know your thoughts in the comments, and feel free to ask me any questions about what was shared here.
I will be working on additional Zerto 10 content, so stay tuned!