Zerto: Create a Virtual Protection Group (VPG)

This blog is the next step following the creation/deployment of the VRAs.

To begin protecting virtual machines, you will need to configure virtual protection groups (VPGs).  A virtual protection group is is an affinity grouping of VMs that make up an application.  VPGs can contain 1 or more virtual machines, and contain all the protection settings required which include:

  • Boot Order
  • re-IP settings for testing and recovery
  • Resource mappings
  • Offsite backup
  • Journaling
  • Re-protection settings

Once a VPG is configured, initial synchronization of the protected virtual machines begins to take place, and once synced, will continuously be protected.

Important:

When performing failover, ALL VMs in the VPG will be failed over, and you are not able to select 
specific VMs within the group to be recovered.

Tips

  • For granular protection and failover capabilities, VPGs can be set up containing single VMs, if your migration/failover plan requires being able to pick and choose systems to recover in an order you specify, when not all involved VMs need to be migrated or failed over.
  • Do not group ALL virtual machines into 1 VPG, as performing a recovery will attempt to recover everything contained within the VPG and in some cases, that’s not the best idea.
  • Whenever possible, group servers that depend on each other or make up an application together. This will allow you to make use of boot options, order, or delay to bring them up in the correct order. This will also prevent missing crucial application servers during recovery or migration.
  • Make use of the test feature for DR testing by setting up an isolated VLAN/portgroup which will allow live testing without impacting production.
  • Make use of the re-IP feature to automate any IP address change that needs to happen either on the test network or recovery network.

VPG Creation

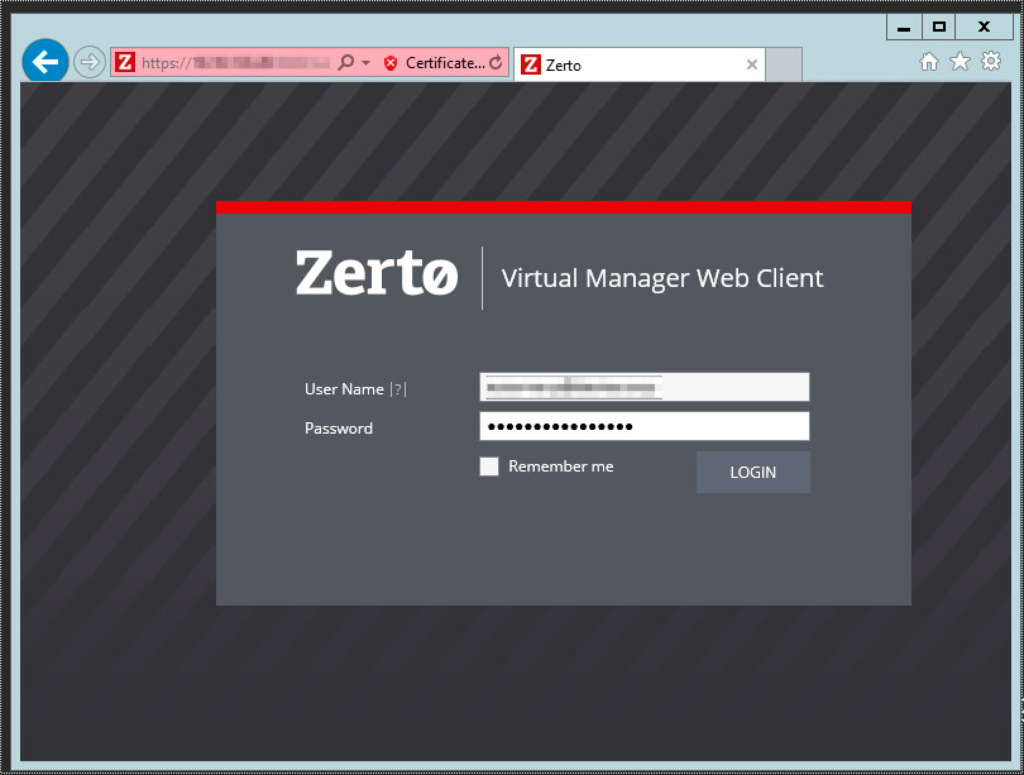
  1. Log in to the Zerto UI
  2. Go to the VPGs tab, and click New VPG.create_vpg_1_2
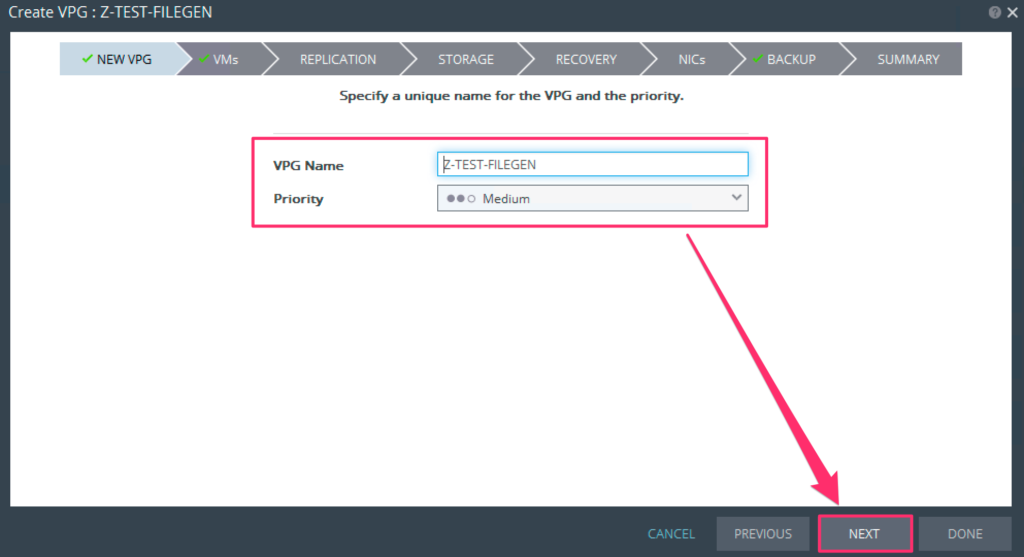
  3. Specify a name for the VPG and set the priority, then click Next.
    In VPGs with different priorities, updates for the VPG(s) with the highest 
    priorities are transferred over the WAN before others.


    create_vpg_1_3

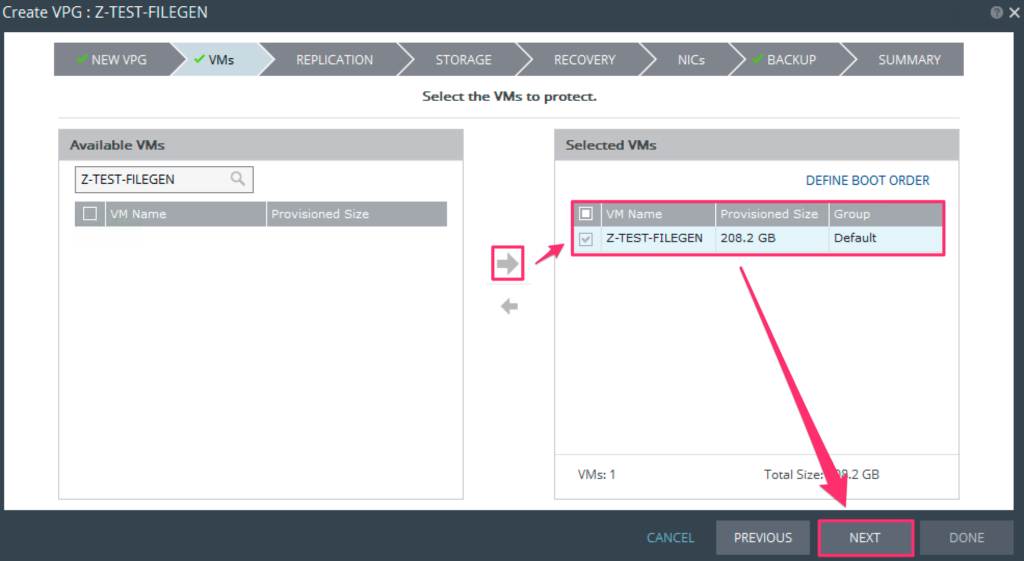
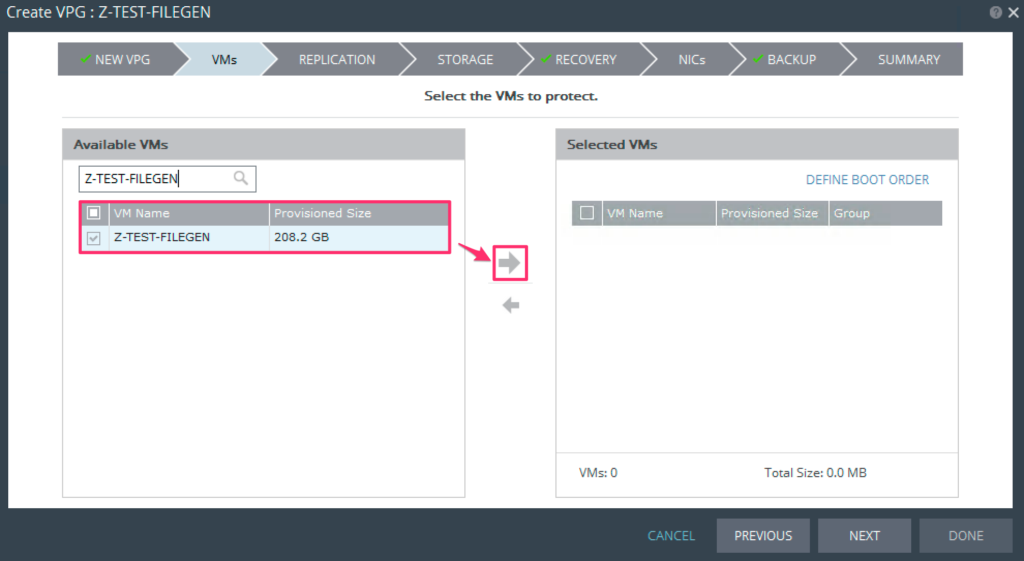
  4. Select the VM(s) you want to include in this VPG, press the right-arrow to move to selected VMs, then click Next.
    Using the search box in the "Available VMs" window will help you minimize the 
    number of VMs listed and focus only on the one(s) you're looking for.
    Zerto uses the SCSI protocol, so only VMs with disks that are configured/support 
    SCSI can be selected to be part of a VPG.


    create_vpg_1_4_a

    create_vpg_1_4_b

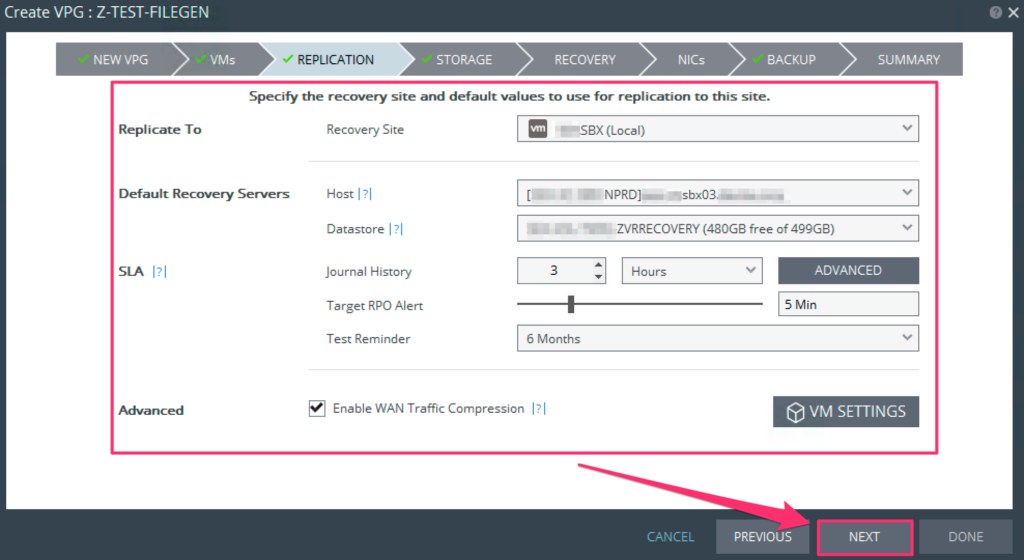
  5. Specify the recovery site and values to use for replication to the site, then click Next.create_vpg_1_5
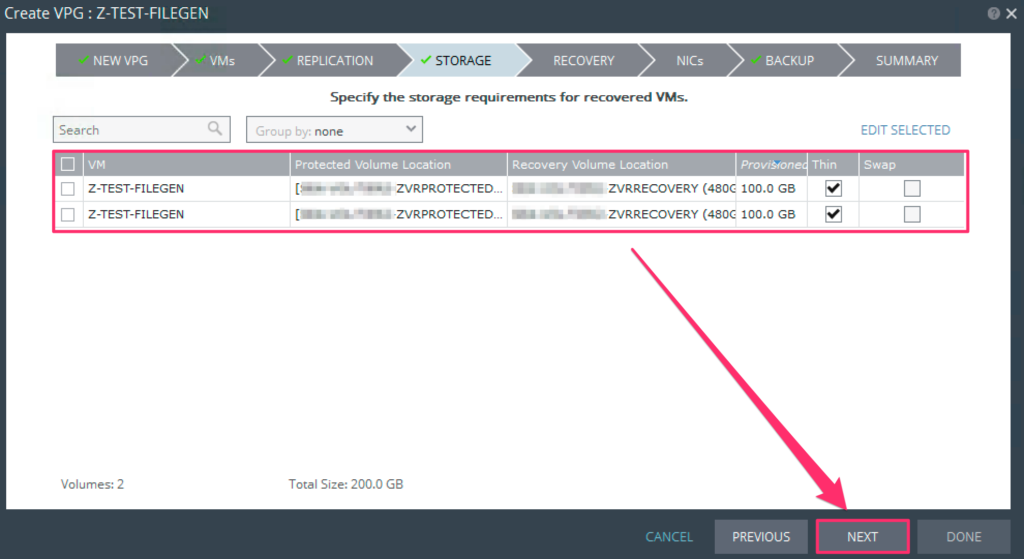
  6. Specify the storage requirements for this VM and click Next.
    If you have pre-seeded the volumes, check the box beside the disks 
    and click the Edit Selected link.  Select Preseeded Volume, then browse to the VMDK 
    for that volume.  Repeat for any additional disks that you have pre-seeded.  This 
    is recommended if your VM is large, and has a high rate of change, or the WAN link 
    is shared and bandwidth is limited.
    create_vpg_1_6

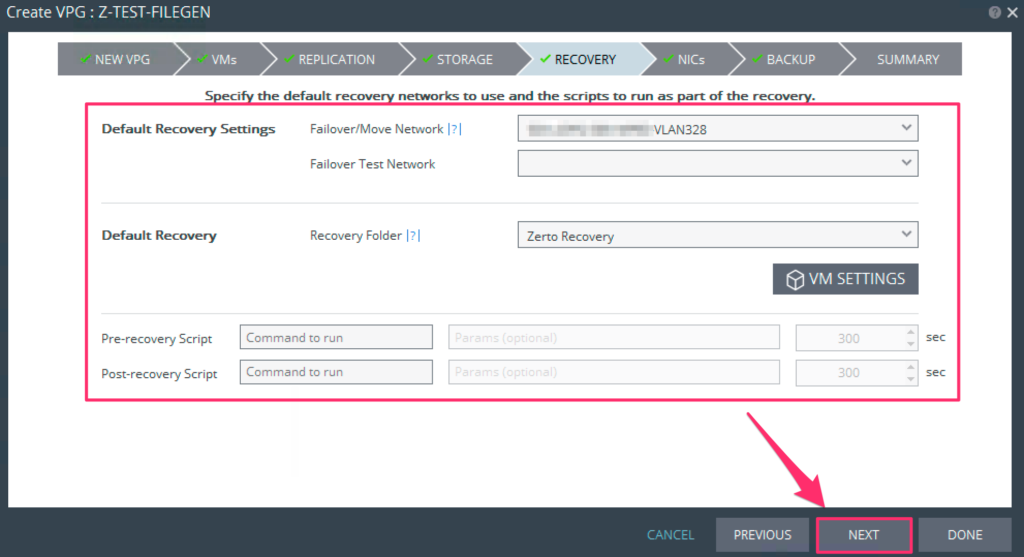
  7. Specify the failover/move network (the newtwork that the recovered VM will run on), the recovery folder, any scripts, and click Next.
    Failover Test Network is optional, but recommended if you will be testing 
    failover prior to committing.
    

    create_vpg_1_7

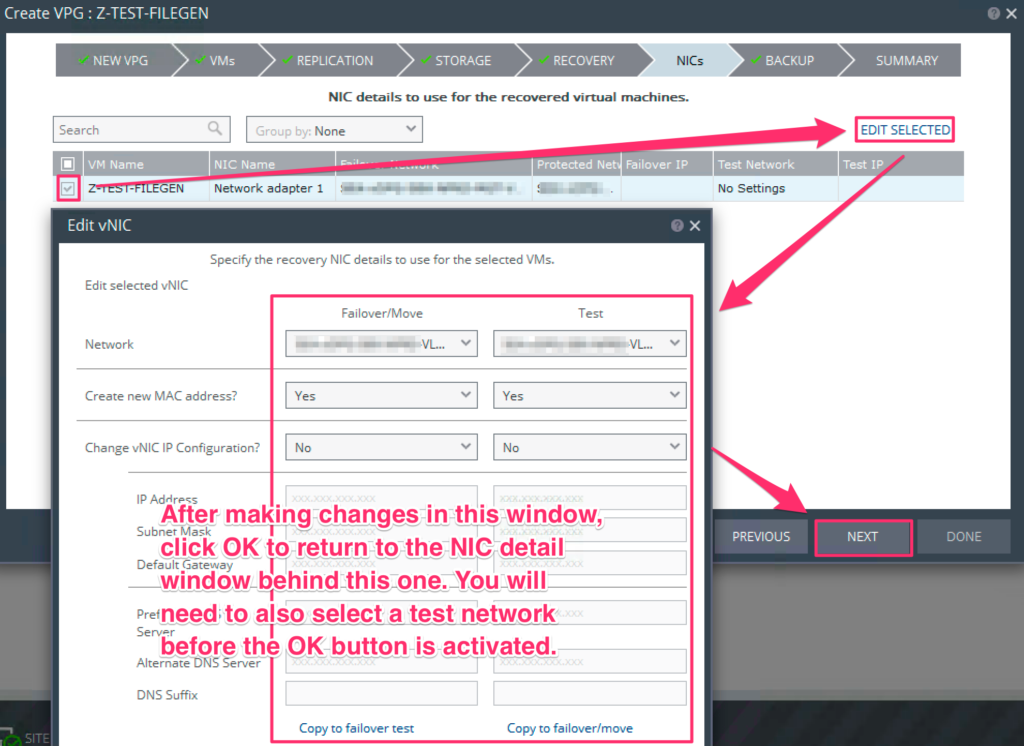
  8. Enter the NIC details to use for the recovered VM, and click Next.
    In some cases, if you're replicating within the same vCenter or cluster, you 
    may end up with a duplicate MAC address warning when recovering, so to avoid this, you 
    can create a new MAC address on the recovery VM during recovery.  In any case, you 
    can also re-IP the VMs as part of the recovery procedure.  To view these 
    settings, check the box beside the VM(s) and click the Edit Selected link.
    create_vpg_1_8

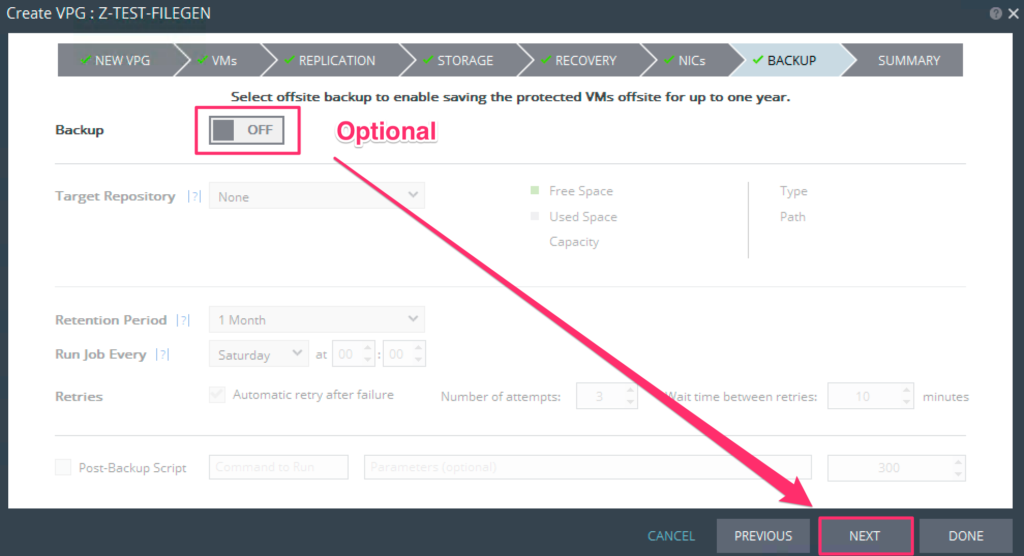
  9. Select whether or not you want to create an offsite backup that can be stored for up to a year, then click Next.  If you don’t need to create a backup, leave this screen at the defaults, then click Next.
    For more information on backups with Zerto, refer to the help file 
    (click the ? button at the tope right of this window), or see the Zerto Virtual 
    Manager Administration Guide.
    create_vpg_1_9

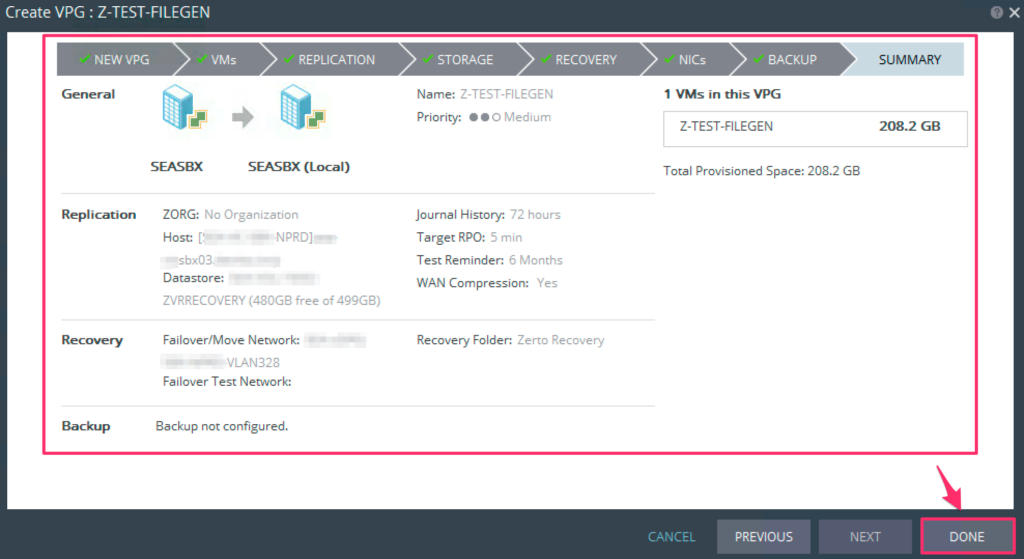
  10. Review VPG settings summary, and if you don’t need to go back and make any changed, click Done.create_vpg_1_10


Share This:

Zerto: Deploy Virtual Replication Appliances

If you’ve followed along with Zerto: ZVM Installation, this entry is a continuation, and provides steps to deploying the Zerto Virtual Replication Appliances.

After installation has succeeded, open a browser, and connect to https://ZVMFQDN:9669/zvm.

Notes:

  • If this VM lives in a protected network for management/utility servers, you might need to allow port 9669 from your local network to the network the ZVM lives in.  The Zerto Standalone UI, vCenter Web Client, and vCenter C# client all use port 9669 to access the ZVM.
  • Be sure to use a supported browser.  Chrome, Firefox, and IE 11+ are recommended by Zerto.
  1. Log on using your vCenter credentials.zerto_vra_deploy_1_1
  2. Enter a license key and click Start.

After entering the license key and clicking start, you’re taken to the dashboard, however, before starting to protect VMs, the VRAs will need to be installed on the hosts in the site and pair the protected and recovery sites.

Install the VRAs

The Zerto installation includes the OVF template for VRAs.  A VRA must be installed on every host that manages protected VMs in the protected site, and on every host that will manage VMs in the recovery site.

The VRA compresses data that is passed across the WAN from the protected to recovery site, and automatically adjusts the compression level according to the CPU usage, totally disabling it if required.

A VRA can manage a maximum of 1500 volumes, whether they are protected or not.

VRA Requirements

Each VRA must have:

  • 12.5GB datastore space
  • at least 1GB of reserved memory
  • Each host installed to must be at least ESX/ESXi 4.0 U1 and have ports 22 and 443 enabled for the duration of the installation.

If you are installing to ESXi 5.5 or higher, the VRA should connect to the host with user credentials, otherwise, the password for the host root account is required.  Because of the method used when the VRA connects to the host using a VIB (ESXi 5.5 or higher), it is not necessary to enter the root password.

During VRA deployment, you should have IP addresses reserved, as it is not recommended to use DHCP; so be sure to also have the information for the subnet mask, and default gateway.

If you do not have SSH enabled on your hosts, the ZVM will attempt to enable and disable it during the installation of the VRA.

Important: Do not snapshot a VRA, as it will cause problems with replication!  I actually
forgot to exclude the VRAs from backups, and CommVault attempted to back them up after I had
configured my first VPG, and I ended up having to re-deploy the VRAs.  My advice is to create a
folder for the VRAs in your vCenter folder structure and have that folder excluded from backups
altogether.  Don't forget to move the VRAs into the folder as soon as they're deployed.

Installation

  1. Log in to the Zerto Manager UI
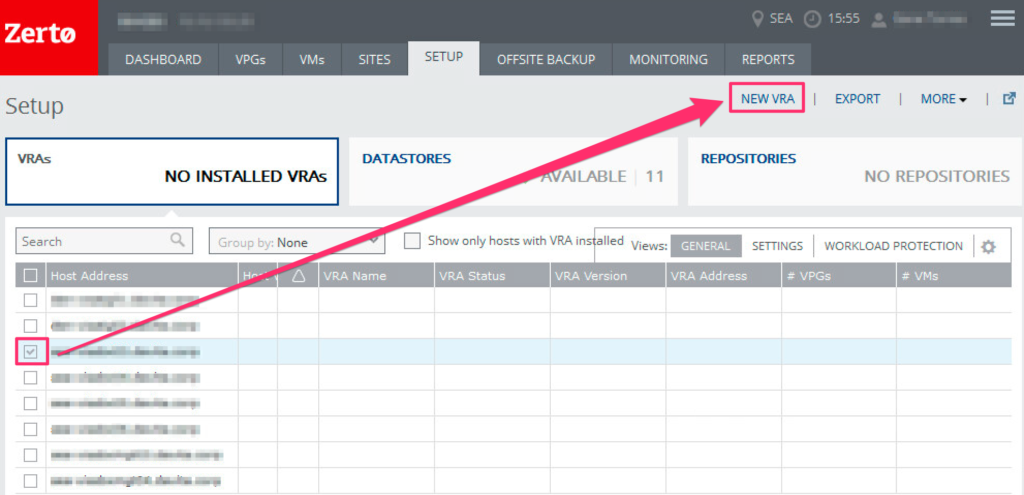
  2. Click on the Setup tab.zerto_vra_deploy_2_2
  3. Locate the host you want to deploy the VRA to, and check the box beside it.  Once you have selected the host, click New VRA.
    Note:  If you select multiple hosts, clicking the New VRA link
    will only install on the first host that you have selected.

    zerto_vra_deploy_2_3

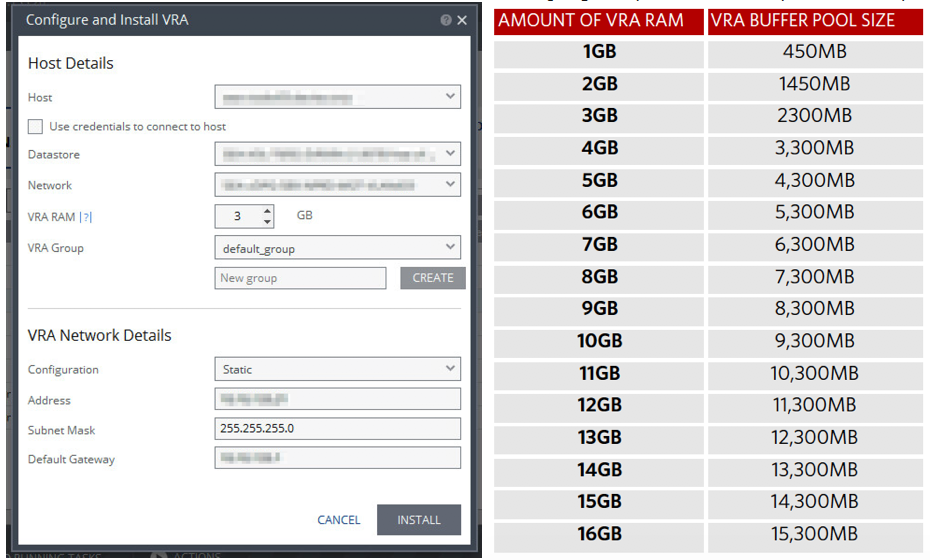
  4. Specify the host, datastore, network, RAM, group, and enter the network details, then click Install.  Repeat the steps for each additional VRA you need to deploy (one per host).
    Note: When you deploy a VRA, Zerto will automatically reserve the amount of
    memory equal to what you specify in the VRA RAM settings.  This amount of RAM is the maximum buffer
    size for the VRA that is used to buffer IOs written by the protected virtual machines before the
    writes are sent over the network to the recovery VRA.  The recovery VRA also buffers incoming IOs
    until they are written to the journal.  If a buffer becomes full, a Bitmap Sync is performed after
    space is freed up in the buffer.
    The protecting VRA can use up to 90% of its buffer for IOs to send to the recovery VRA, which can
    use up to 75% of its buffer before it is full and requires a bitmap sync.

    zerto_vra_deploy_2_4

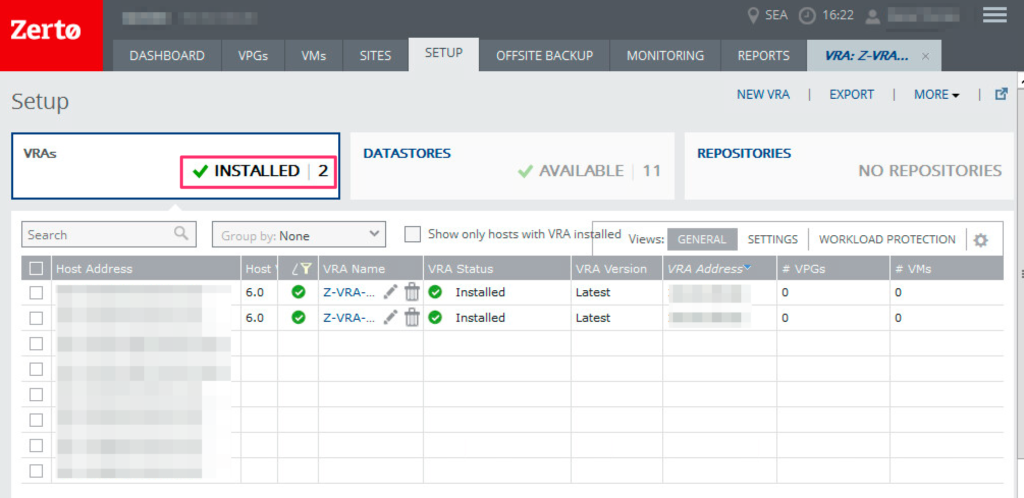
  5. After all VRA installations are completed, the setup tab will contain more information for each host that has a VRA installed.zerto_vra_deploy_2_5

Once you’ve completed these steps for each host requiring a VRA, you can create Virtual Protection Groups and start protecting your workloads.

Share This:

Zerto: ZVM Installation

Here we go!  The following procedure is a step-by-step installation of Zerto Virtual Replication 4.5 U3.  Before starting, you should have built 2 Windows VMs per the Zerto system requirements.  If this is being done in production, be sure to size the servers as needed for the number of VMs you will be protecting.

The version being installed is 4.5 U3.

System Requirements

Note: Be aware of OS limitations when dealing with 32-bit vs 64-bit.  In a 32-bit Windows Server installation, the maximum amount of RAM you can give the system (that it can actually use) is 4GB.  If you’re using Windows Server 2008 R2 or Windows Server 2012, they’re only available in 64-bit, so you won’t need to worry about this limitation.  For more information on Windows memory limitations, please see this.

Now we’ve got that out of the way, here are the system requirements for the Zerto Virtual Manager as of version 4.5 U3:

For the ZVM at Each Site

  • VMware vCenter 4.o U1 or later with at least 1 ESXi host
  • The account you log into the ZVM with and use to run the service will need to have administrative privileges in vCenter.
  • Supported Windows Operating Systems:
    • Windows Server 2003 SP2 or higher
    • Windows Server 2008
    • Windows Server 2008 R2
    • Windows Server 2012
    • Windows Server 2012 R2
  • Resource Reservations in vSphere
    • CPU: Reserve at least 2 vCPUs
    • Memory: Reserve at least 4GB
  • Resource Requirements for ZVMs:
    • Up to 750  protected VMs and up to 5 peer sites:
      • 2 vCPU, 4GB RAM
    • 751-2000 protected VMs and up to 15 peer sites:
      • 4 vCPU, 4GB RAM
    • > 2000 protected VMs and > 15 peer sites:
      • 8 vCPU, 8GB RAM
  • Time/NTP Requirements:
    • Zerto VMs must be synchronized with UTC (you can set actual timezones)
    • It is recommended to use an NTP server for clock synchronization.
  • Microsoft .NET Framework 4 (included with the Zerto installation package)
  • Storage: At least 2GB, plus 1.8GB if you need to install the .NET Framework

For the ZRA on Each Host

One VRA should be installed per host in a participating cluster.  By doing this, you are accounting for any vMotion or DRS activity related to any protected VM in the cluster(s).  ZRAs are deployed from within the Zerto UI, and furthermore, when this is done, DRS affinity rules are automatically created for the ZRAs, and any reservations required are automatically created.

Important:  After deployment of the ZRAs, be sure to add the ZVM and ZRAs into a folder in vCenter that can be excluded from any snapshots.  In otherwords, if you’re using VADP for backups, be sure to exclude this folder, or each ZRA/ZVM from within your backup software.  Failing to do so will cause corruption and you will have to re-deploy the ZRAs.  Furthermore, this will prevent any performance degradation that is a result of snapshot cleanup/consolidation jobs.

ZRAs require the following resources:

  • 12.5GB of datastore space (per ZRA)
  • At least 1GB RAM (reserved automatically through deployment process)
  • ESX/ESXi 4.0 U1 or higher
  • Ports 22 and 443 open on each host during installation of the ZRA (During ZRA deployment, Zerto will also attempt to enable the SSH service on each host, however, if it fails, you will need to manually enable/disable).
  • You’ll need to identify what datastore to install the ZRA to.
  • Static IP Address for each ZRA (recommended to use static)
    • IP Address (f0r each ZRA)
    • Subnet Mask
    • Default Gateway

ZRAs will automatically be named by Zerto during deployment, and clearly indicate what host they are running on.

Network Requirements

  • > 5MB/s is required for Zerto

ZVM Installation

Once you’ve built your Windows VMs to house the ZVM, the steps below will guide you through the installation.  This will need to be done in both sites, although, if you only have 1 site, you can still protect and recover within the same site.  Please note that if you are installing in 2 geographically separated sites, you may need to open some firewall ports before pairing sites and initiating replication.  For firewall requirements, see this document.

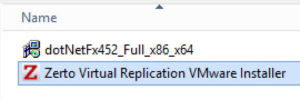
  1. Browse to the directory where you have downloaded the installation files to and run the installer (Zerto Virtual Replication VMware Installer).zerto_installation_files
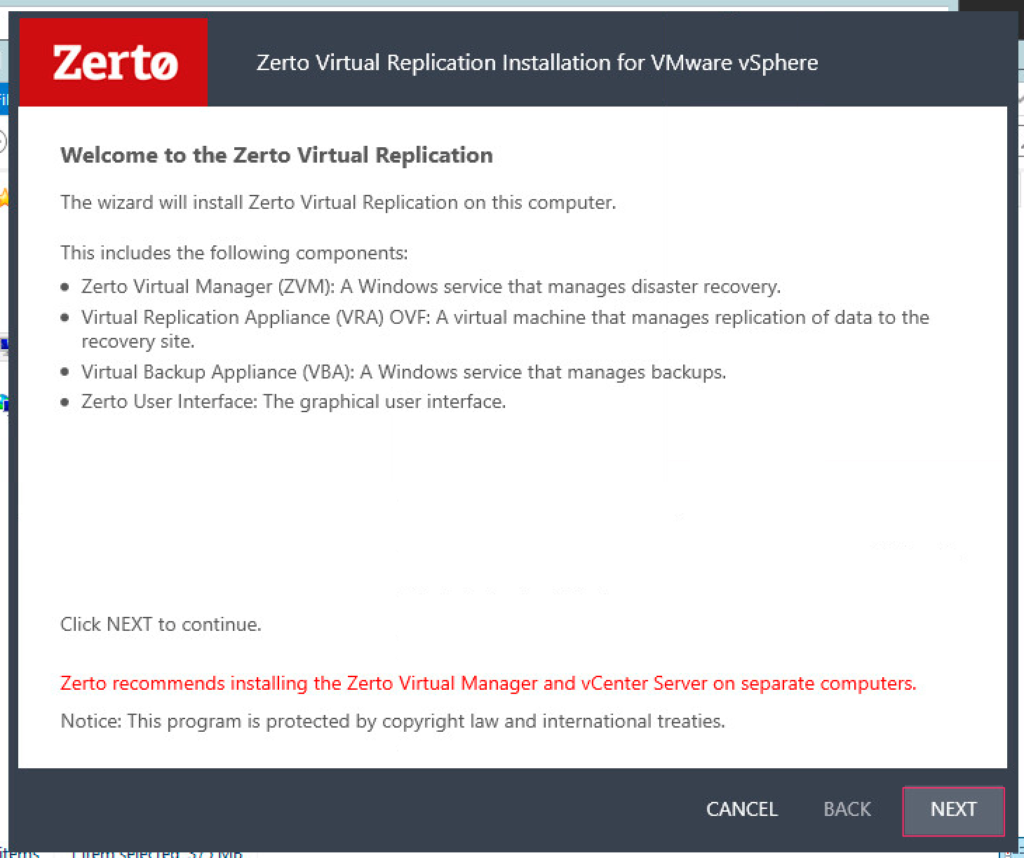
  2. Click Next on the welcome screen.zerto_installation_1_2
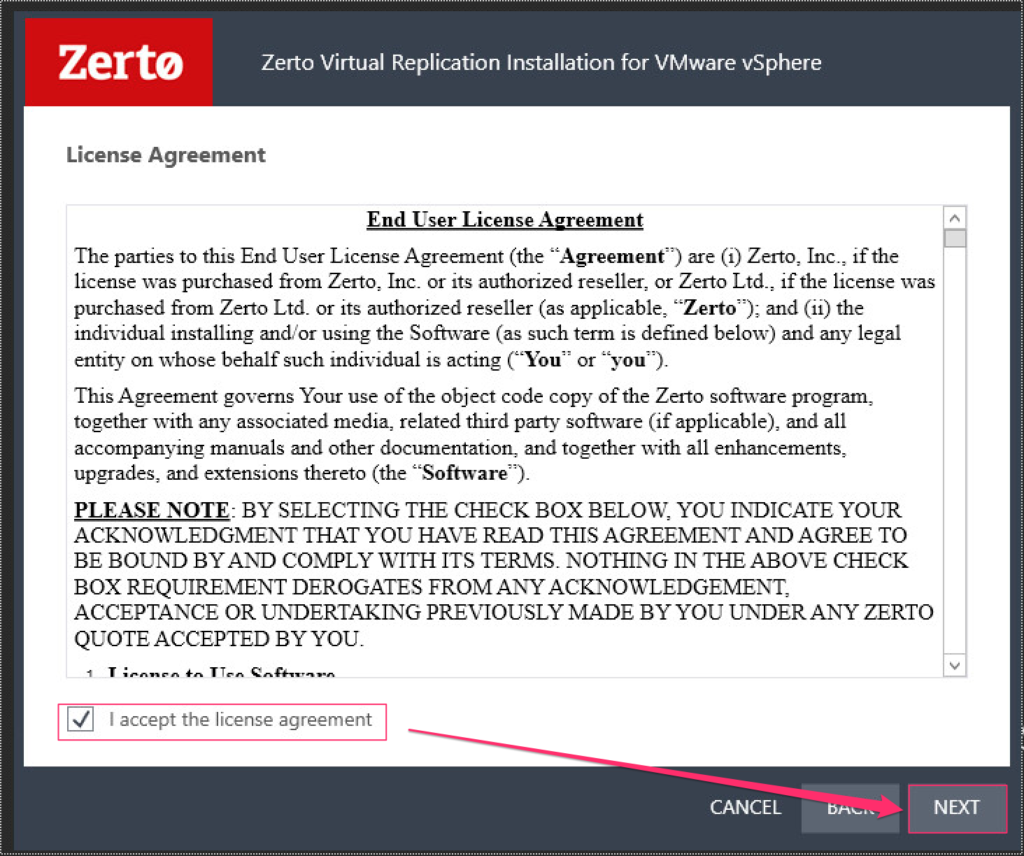
  3.  Accept the License Agreement, and click Next.zerto_installation_1_3
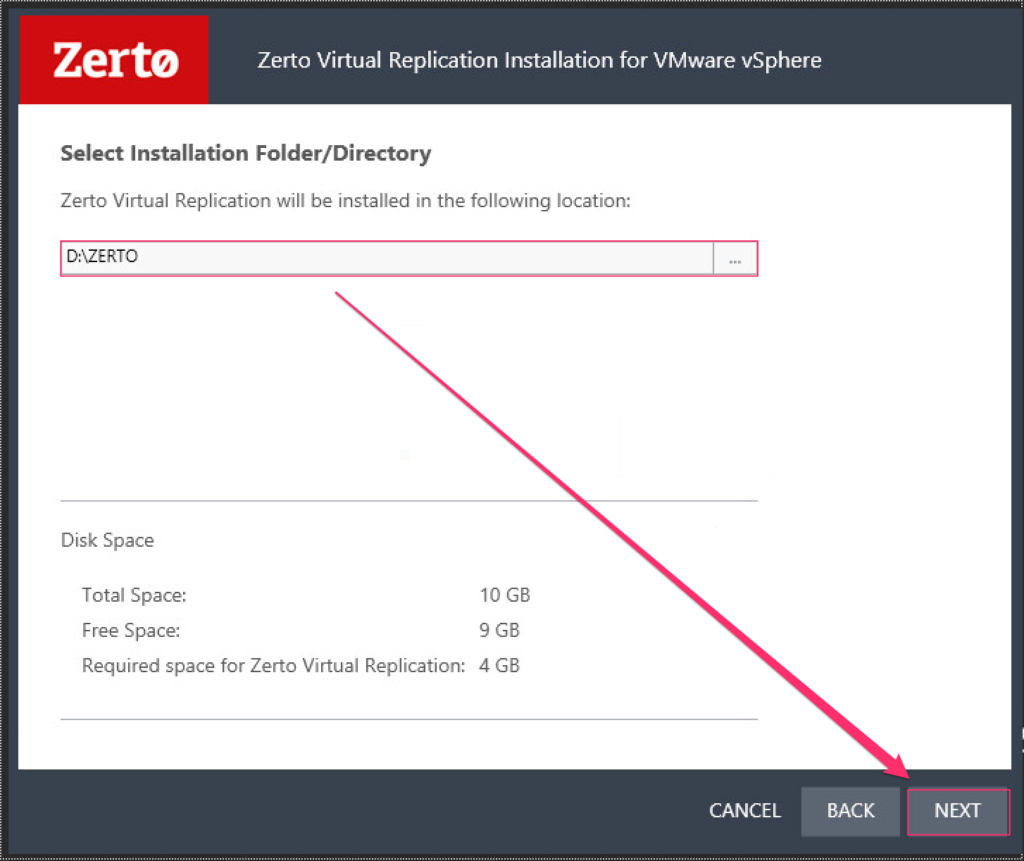
  4. Select the installation directory, and click Next.zerto_installation_1_4
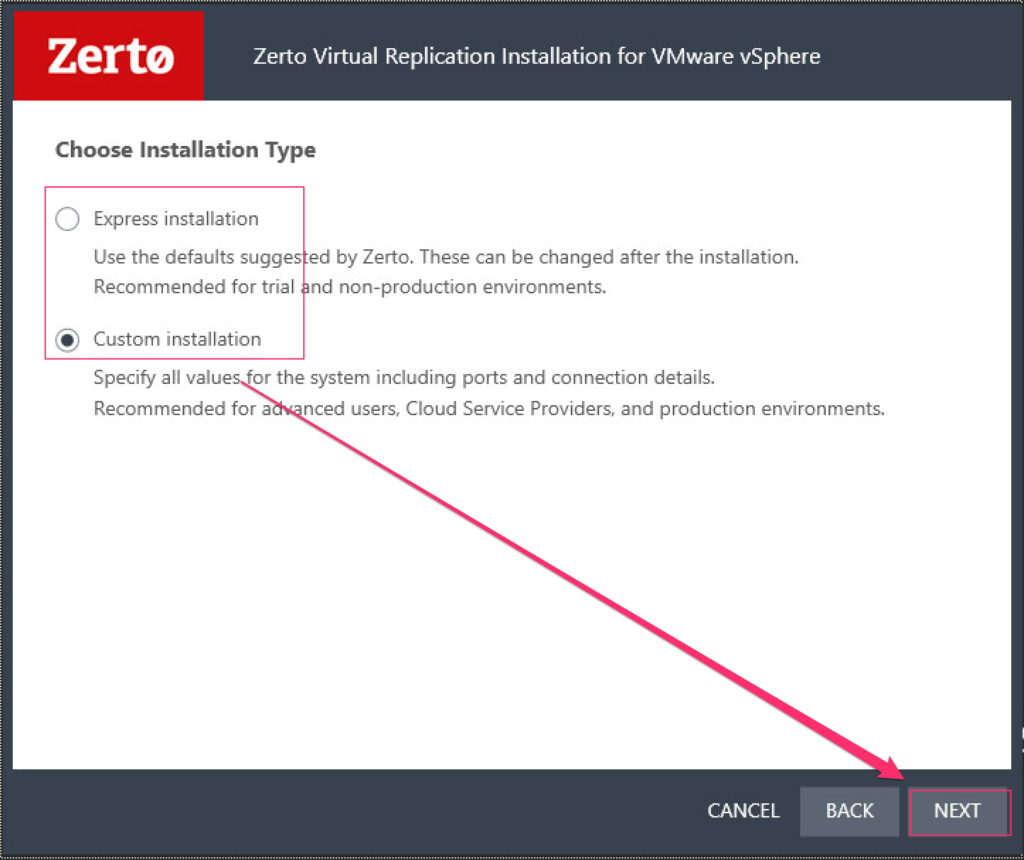
  5. Select the installation type, and click Next.zerto_installation_1_5
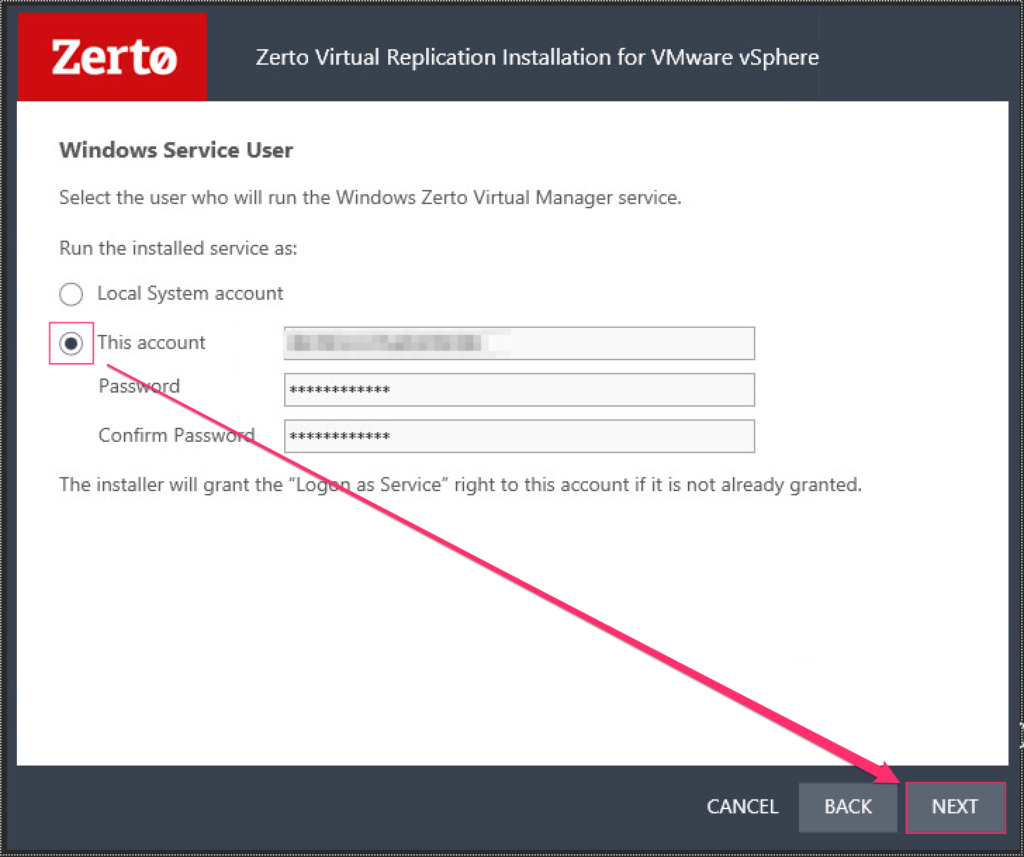
  6. Select either “Local System Account” or “This Account” if you have a dedicated service account.  Either way you decide to go, the account will require unrestricted access to the local resources on the ZVM.  After you made your selection, click Next.zerto_installation_1_6
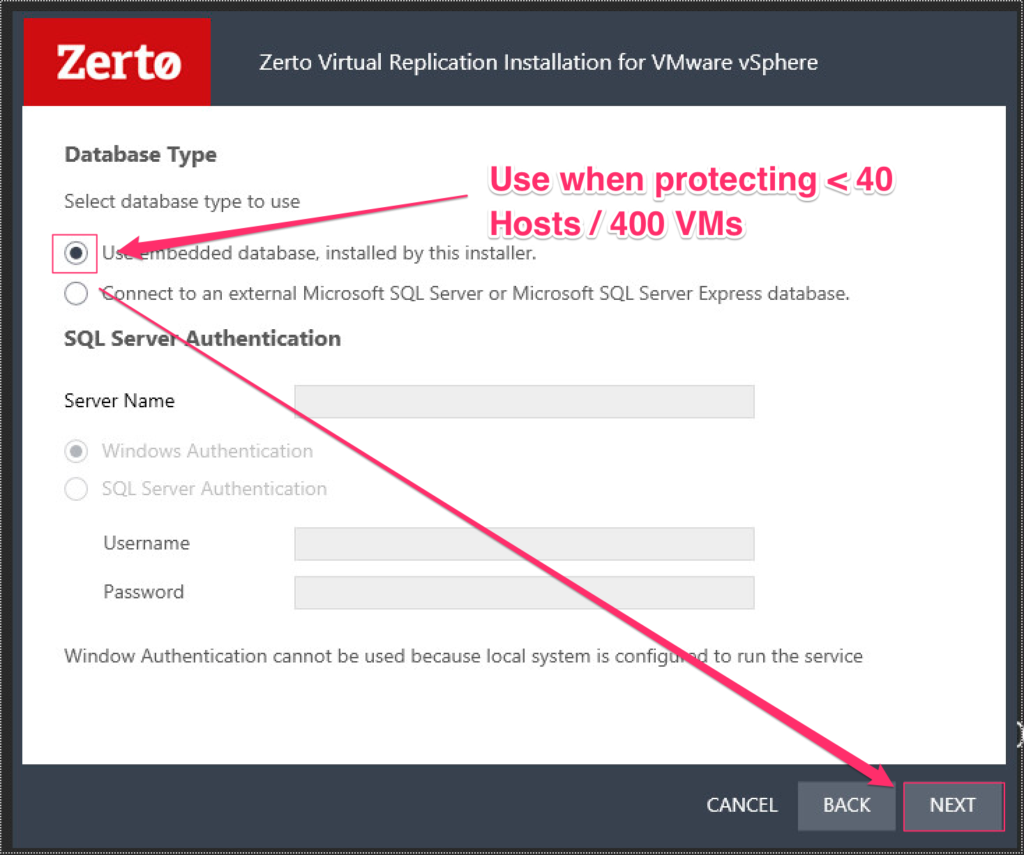
  7. In the Database Type dialog box, select your database type, and click Next.Notes:  It is recommended to use an external SQL server when a site has more than 40 hosts that have VMs that need to be protected, and the site has more than 400 VMs that need to be protected.  If you use Windows Authentication for the SQL server (external), then the creadentials in step 6 will be used.zerto_installation_1_7
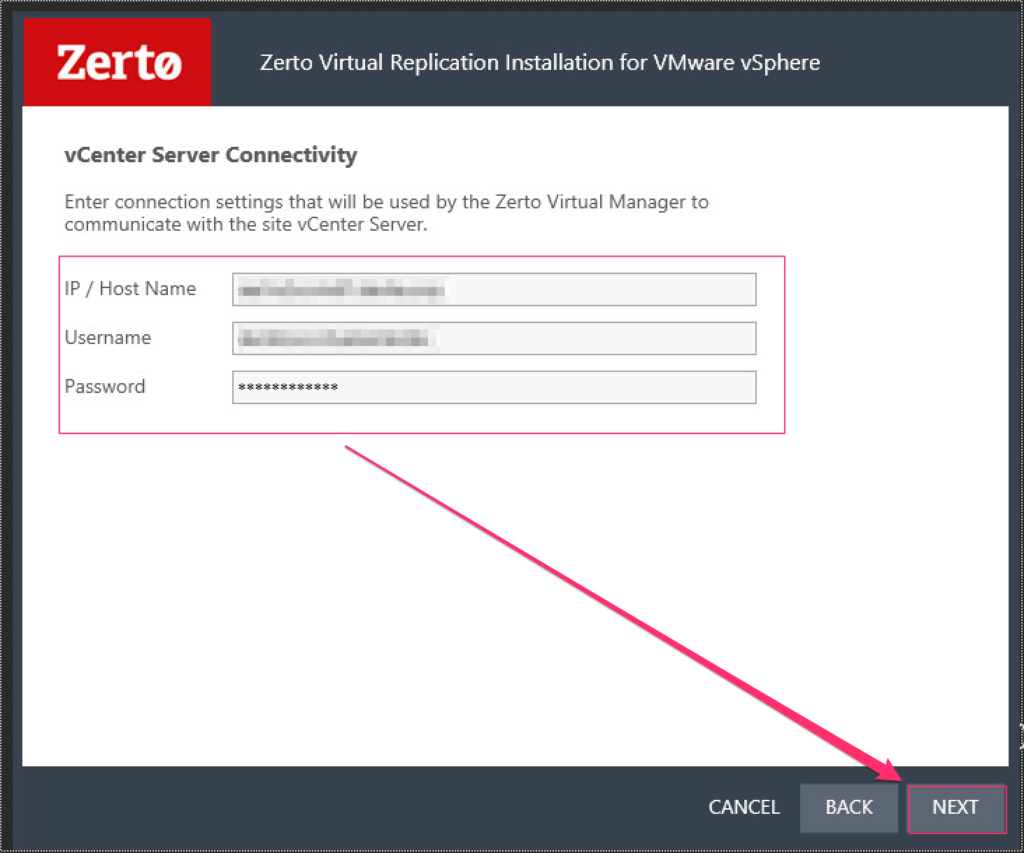
  8. Enter the name of the vCenter along with the admin credentials that will be used to connect, then click Next.zerto_installation_1_8
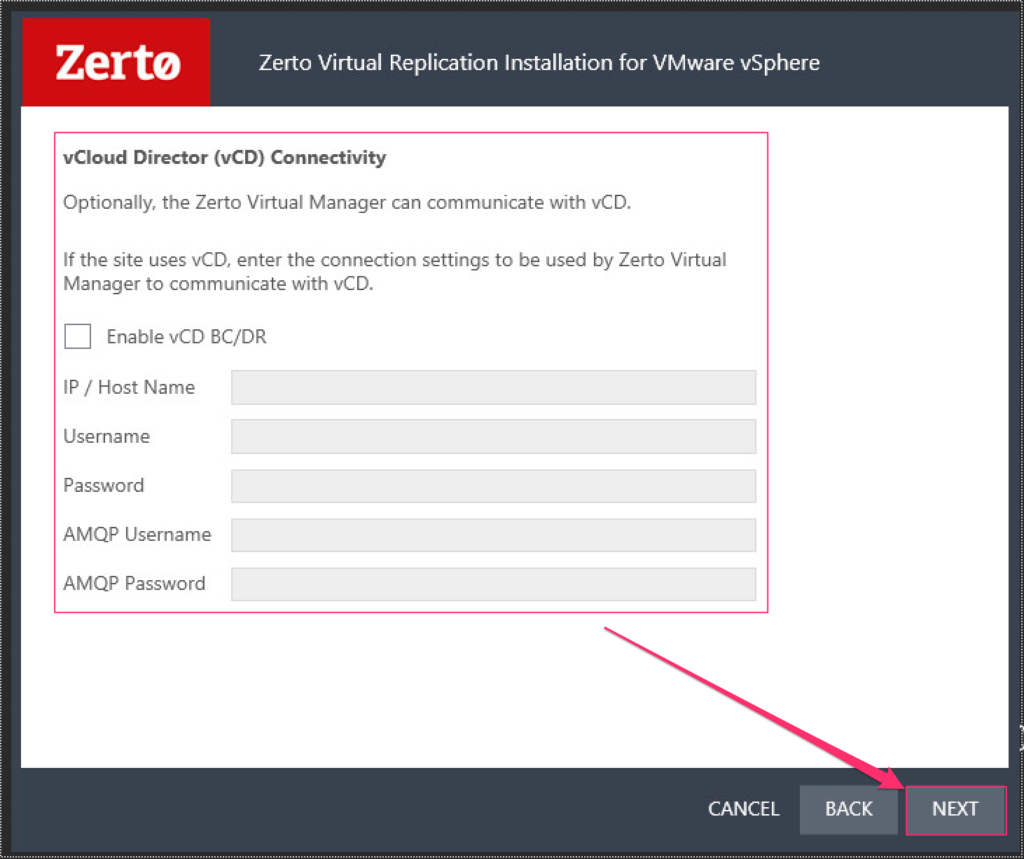
  9. Optional: If you have vCloud Director and want to protect it using Zerto Virtual Replication, enter the information necessary to connect to it, and click Next; otherwise, leave the “Enable vCD BC/DR” box unchecked, and click Next.zerto_installation_1_9
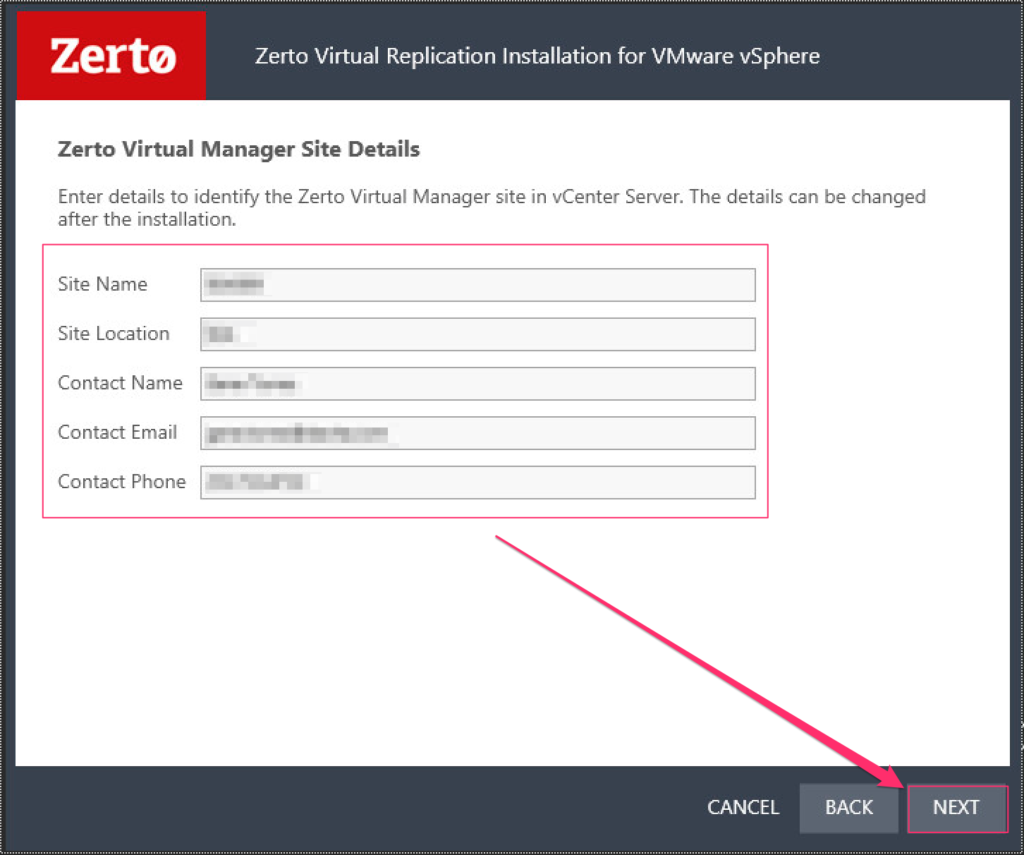
  10. Enter the Zerto Virtual Manager settings to identify this installation, and click Next.zerto_installation_1_10
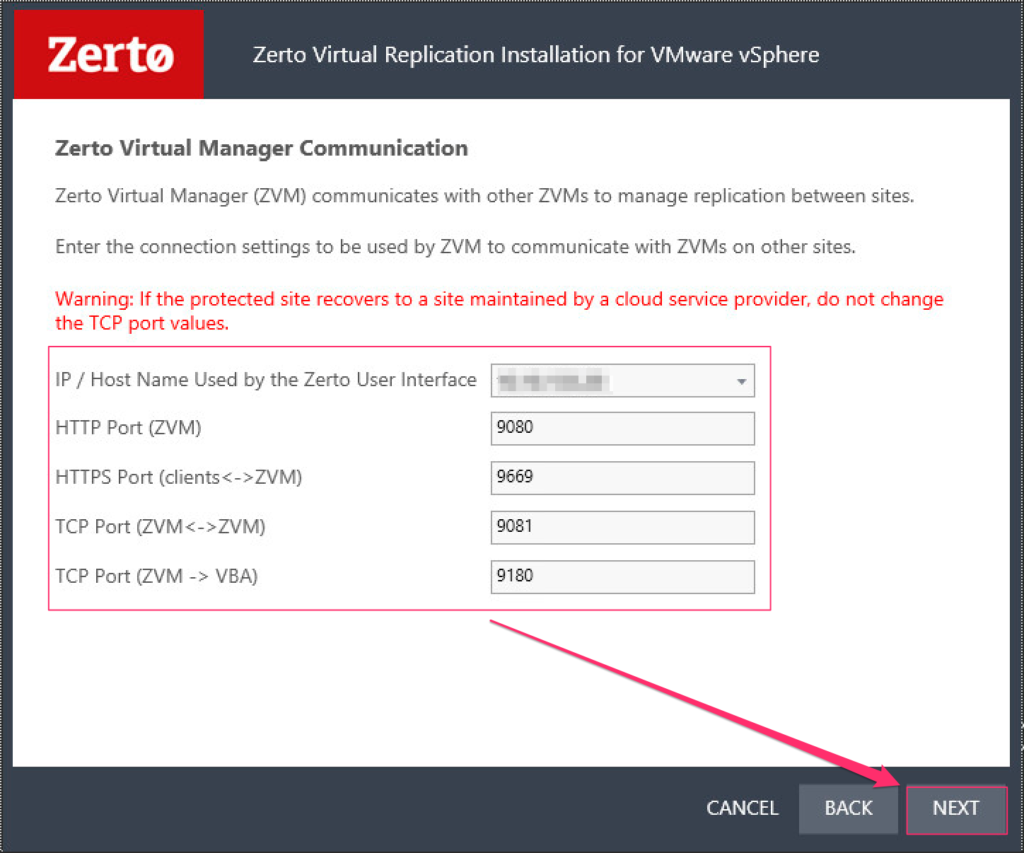
  11. Enter the required information for ZVM communication, and click Next.  The ports listed below are defaults, and if you recover to a site managed by a Cloud Service Provider, be sure you do not change the default ports.zerto_installation_1_11
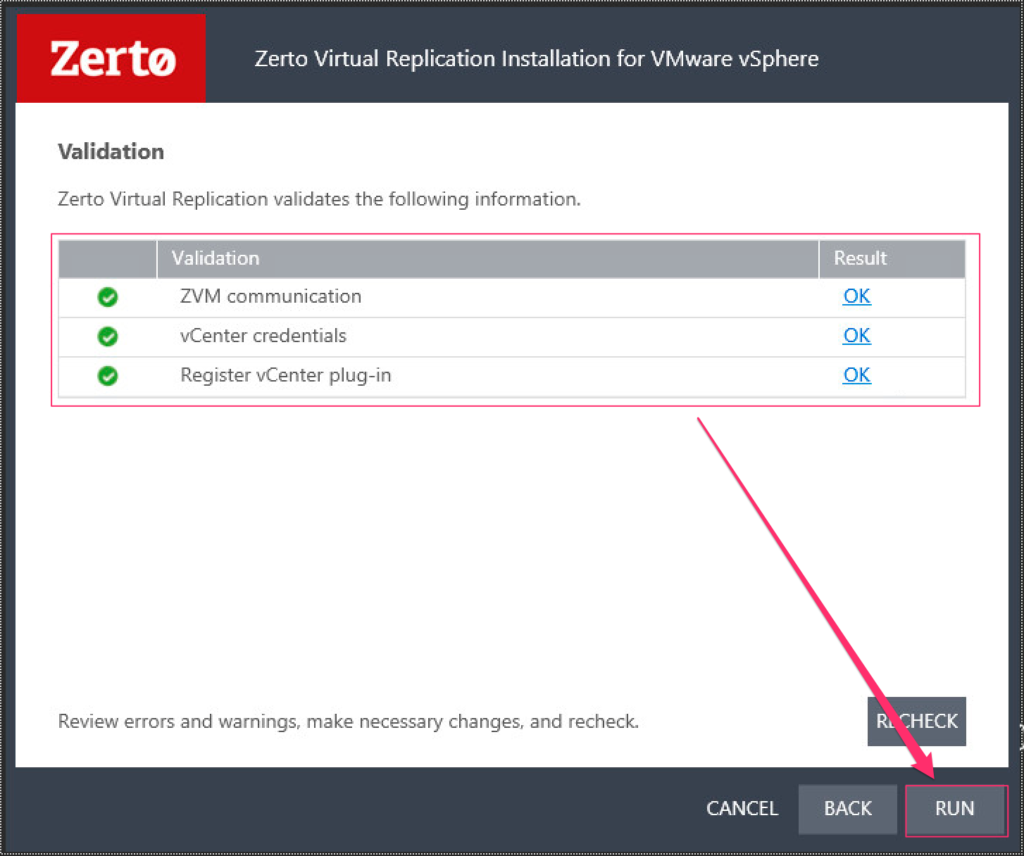
  12. As soon as you click Next on the screen in the previous step, the installer will auto-validate ZVM communication to ensure the ports to this ZVM are opened, it will verify vCenter credentials that you specified, and will register the vCenter plug-in.If the validation for each item results in “OK”, click Run, otherwise, resolve any errors, and click Recheck.zerto_installation_1_12
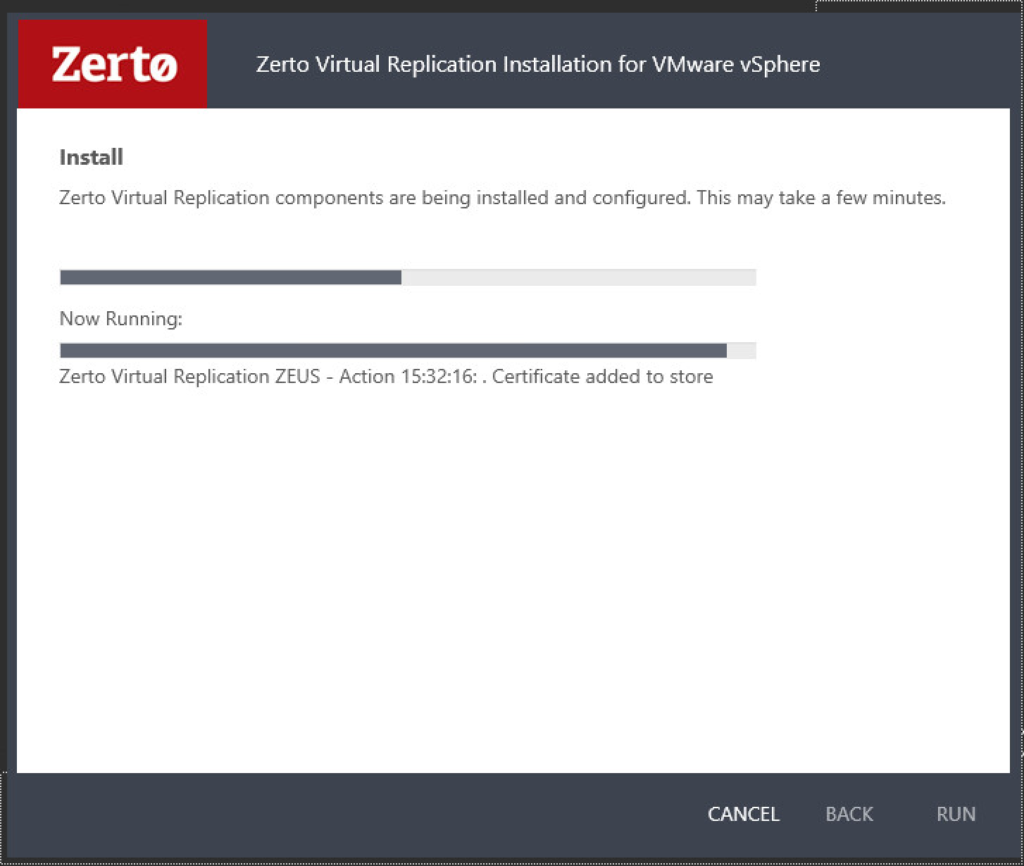
  13. If you clicked Run, Zerto Virtual Replication will begin installation and the configuration of components.zerto_installation_1_13
Share This:

Zerto 4.5 POC Design

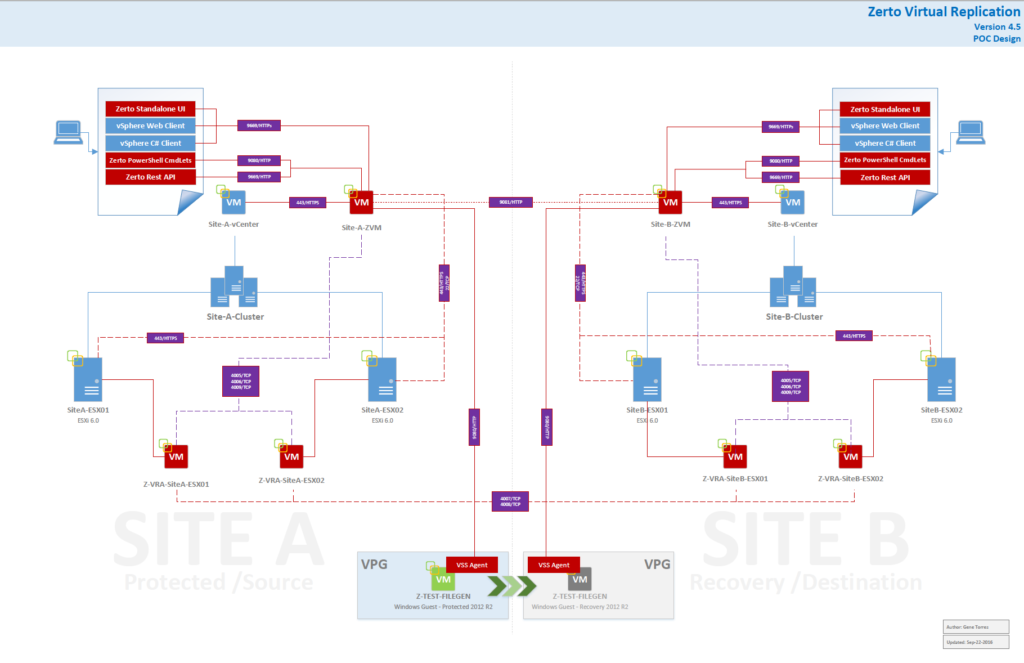
In addition to VMware Site Recovery Manager testing, I’ve also built a 2-site Zerto proof-of-concept environment in the sandbox, which actually spans two geographically separated sites for a real-world test, minus the production workloads.

I have just concluded SRM with vSphere Replication testing, and we’ve decided to trash the array-based replication option, due to cost, complexity, dependencies, etc, etc… and favor vSphere Replication for an apples-to-apples test agains Zerto Virtual Replication.  Besides, after spending a couple of weeks with our SAN engineers troubleshooting Array-based replication to no avail (in addition to all considerations listed above), we felt it would be way too expensive to have the same storage in each site we’d like to protect or recover to and we’d also have to re-architect how we design datastores for vSphere.  Hypervisor replication is much more agnostic, and furthermore, so is Zerto.

I will write up a comparison on SRM and Zerto as soon as my documentation catches up with me for anyone interested in a side-by-side comparison.

Anyhow, just as I did with SRM, here is a topology diagram of how I have deployed Zerto in the sandbox environment.  How-to’s and overall comparison/issue tracking/notes will follow.  Firewall ports between all entities are also included, however, I did not include system specs for any of the infrastructure seen below.  I also did not include any of the Zerto Backup or Zerto Cloud Manager functionality, as this was not a requirement for the testing.  I will include system requirements in a later entry.

You can download a copy of this diagram as a PDF.

Note: This can also be replicated if you have a single physical ESXi host to build virtual ESXi hosts and infrastructure beneath it.  There are a number of resources on the web that will show you how to build a nested ESXi lab, this is just one of them, but it is detailed, and easy to follow along with, and has lots of pictures.  In order to duplicate this though in a single host with nested ESXi and vCenter, you will need to be conscious of resource requirements.

zertovr_45u3_poc_design


Share This:

Zerto Virtual Replication 4.5

In addition to VMware Site Recovery Manager evaluation, I’ve also been asked to perform a side-by-side comparison with Zerto Virtual Replication, and provide an outcome report to help leadership make an informed decision on which product will best meet our BCDR requirements.

In addition to our current use case for BCDR, we’ve recently acquired another business, who already has Zerto licenses; so, I’ll also be evaluating Zerto’s capability to migrate virtual workloads between sites.

IMHO for something like a migration project where we’re not shutting down a data center, Zerto would work great due to the fact that it is simple, and the software is very agnostic in terms of versioning. Even moreso,  it can protect and recover in two completely different virtualization environments, namely VMware vSphere versus Microsoft Hyper-V (cloud too).

I’m already expecting the laundry list of “tasks” with Zerto to be extremely short, and since I’ve worked with Zerto in my previous role as a PS Engineer for a local consulting firm, I know it works and it will blow their minds.

mindblown


Share This:

SRM 6.1 POC Update – Post Failed PSC Remediation

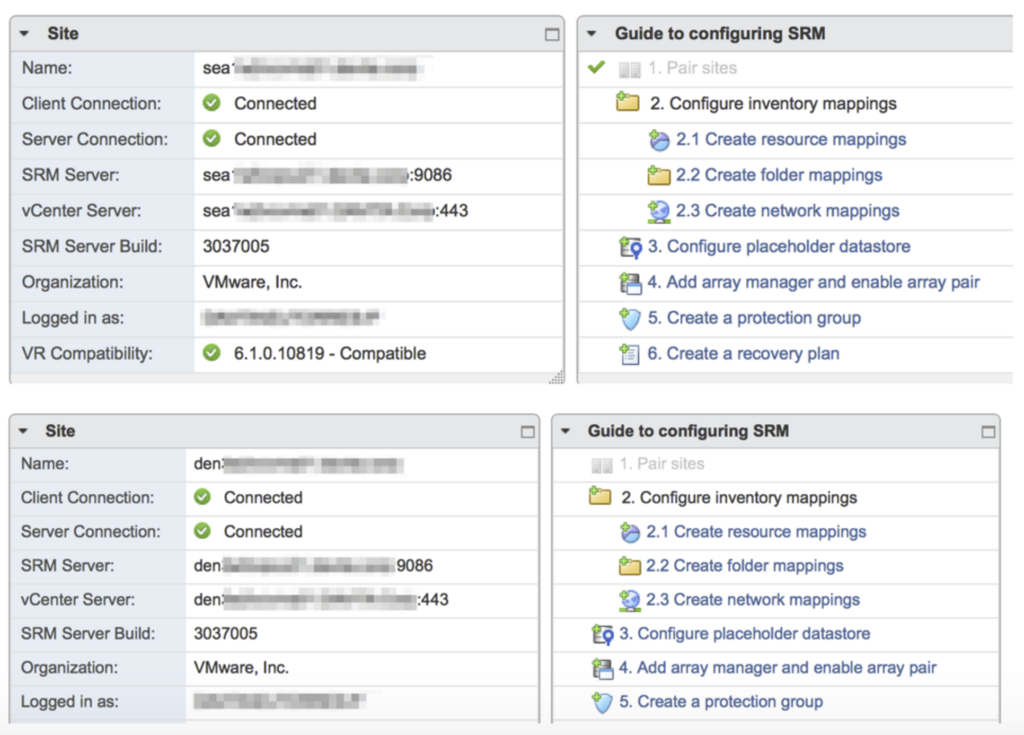
Just an update here to show that after resolving that PSC synchronization issue in our environment, I am now able to successfully pair the two SRM sites in our POC.

Since I have replaced the failed PSC with a new one (new name/IP), and the SRM server was initially connected to the old PSC, I had to first modify the SRM installation and update the PSC it was pointed at. Once I did that, site pairing was successful, and all those SSL and user/password errors I was getting went away.

srm_poc_update_post_pscfix

So, my advice if you run into the same issues as I did – is not to count other systems in the environment out, otherwise, you may be thrown for a loop and support would be no help.

If we hadn’t discovered that synchronization issue between external PSCs, this would have likely been an ongoing issue and it would have seemed like there was no light at the end of the tunnel.

For a recap of the issues seen with site pairing due to the PSC synchronization being broken, see this blog entry.

Share This:

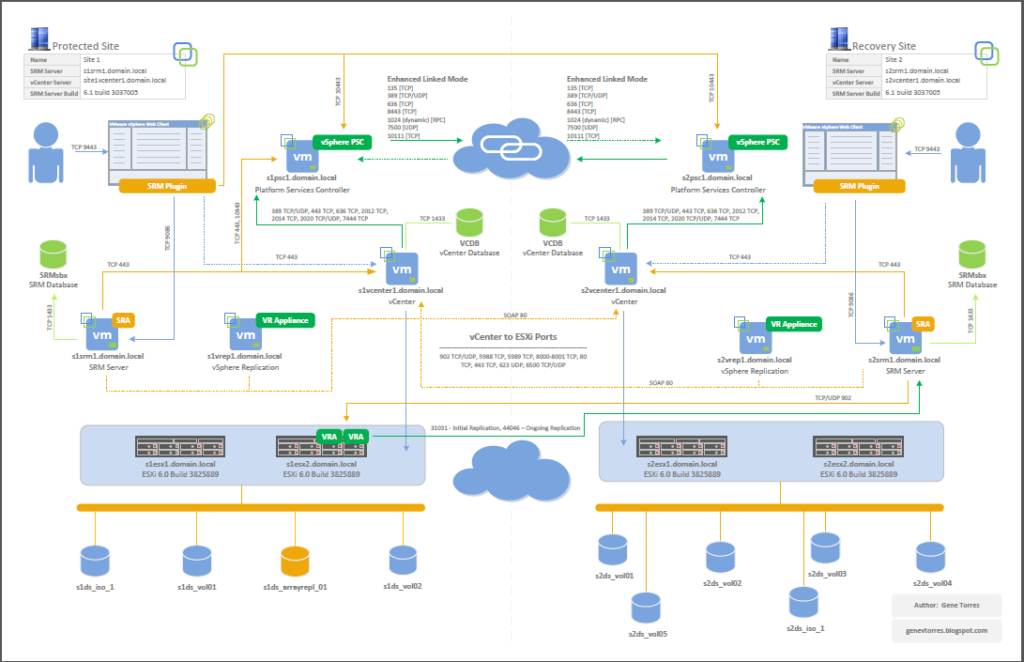
VMware Site Recovery Manager 6.1 Diagram

I wasn’t able to locate a complete diagram for SRM that included both the various services PLUS the communication ports, all rolled up into a deploy-able topology,  so I took it upon myself to gather the information I needed, and build something that would work for me as a reference tool as well as a conversation piece.

The design seen is an actual POC design I’m working with in a live enterprise network (sandbox vCenters and clusters). The result of it all is a topology diagram with vSphere and SRM ports and protocols baked right into it.

If you are interested in obtaining a PDF version of this diagram, click here.

SRM 6.2 2-site Topology
Resources

Share This: