As a follow-up to my previous blog entry titled “Zerto Virtual Manger Outage, Replication, and Self-Healing“, which covers a ZVM failure scenario in an environment with paired ZVMs and two vCenters, I also decided to test and document what I found to be a useful solution to being able to recover from a failed ZVM in an environment where there is only one vCenter and one instance of Zerto Virtual Replication installed. Granted, this is generally not a recommended deployment topology due to potentially having a single point of failure, this type of deployment does exist, and this should provide a suitable solution to allow recovery.
The following has been successfully tested in my lab, which is a vSphere environment, but I also do anticipate that this solution can also be carried over to a Hyper-V environment; which I’m hoping to test soon.
Since my lab originally consisted of two vCenters and two ZVMs, I first had to tear it down to become a single vCenter and single ZVM environment for the test. Here is what I did, should you want to test this on your own before deciding whether or not you want to actually deploy it in your environment.
Disclaimer:
Once again, this is not generally a recommended configuration, and there are some caveats similar to the referenced blog entry above, but with that said, this will allow you to be able to recover if you have Zerto deployed in your environment as described above.
Considerations
Please note that there may be some things to look out for when using this solution because of how the journal contains data until the checkpoints have been committed to the replica disk:
- Journal disk being added at the time of a ZVM failure
- VRA installation, new VRA installation at the time of a ZVM failure
- Changes made to protected VMs (VMDK add) may not be captured if coinciding with a ZVM failure
- VPG settings changed at the time of a ZVM failure, such as adding/removing a VM from a VPG
Based on additional testing I’ve done, it makes best sense to keep the journal size of the VPG protecting the ZVM as short as possible because any changes that occur to the ZVM (any of the above) will first go to the journal before aging out and being committed to the replica disk. If those changes don’t commit to the disk, they will not appear in the UI when the ZVM is recovered using this method.
This was found by creating a VPG to protect another set of workloads, and then 10 minutes later, running through the recovery steps for the ZVM. What I didn’t account for here is the FIFO (first-in-first-out) nature of the journal. Because the change I had made resided within journal for the protected ZVM, it did not get a chance to age out to disk. Recovering from the replica did not include the new VPG.
As a result, the recommendation for journal history when protecting the ZVM would be 1 hour (the minimum) – meaning your RPO for the ZVM will be 1 hour.
Setup the Test Environment
Before you can test this, you will need to configure your lab environment for it. The following assumes your lab consists of two vCenters and 2 installations of Zerto Virtual Replication. If your lab only has 1 vCenter, simply skip the “lab recovery site” section and move to the “lab protected site” steps.
In lab recovery site:
- Delete all existing VPGs
- Delete VRAs (via the ZVM UI)
- Un-pair the two ZVR sites (in the sites tab in ZVM UI)
- Remove hosts from recovery site vCenter
In lab protected site:
- [Optional] Create a new cluster, and add the hosts you removed from your recovery site.
- Deploy VRAs any hosts you’ll be using in for the test.
- Configure VPGs.
Protect the ZVM using Zerto
One thing I’ve wondered about that I finally got around to testing is actually protecting the ZVM itself using ZVR. I’m happy to say, it appears to work just fine. After all, Zerto does not make use of agents, snapshots, or disrupt production for that matter, as the technology basically replicates/mirrors block writes from the protected to the recovery site after they’re acknowledged via the virtual replication appliances, not touching the protected workload.
Protecting the ZVM is as simple as protecting any other application, via a VPG (Virtual Protection Group). While you can likely protect the ZVM via storage snaps and replication, you’re still not going to get an RPO anywhere close to what Zerto itself can provide, which is typically in seconds – many cases single-digit seconds. What this means, is that your amount of data loss, in the case of the ZVM, will likely be in minutes, even shorter if you can automate the recovery portion of this solution via scripting.
So, a few things to make this solution easier when creating the VPG to protect the ZVM:
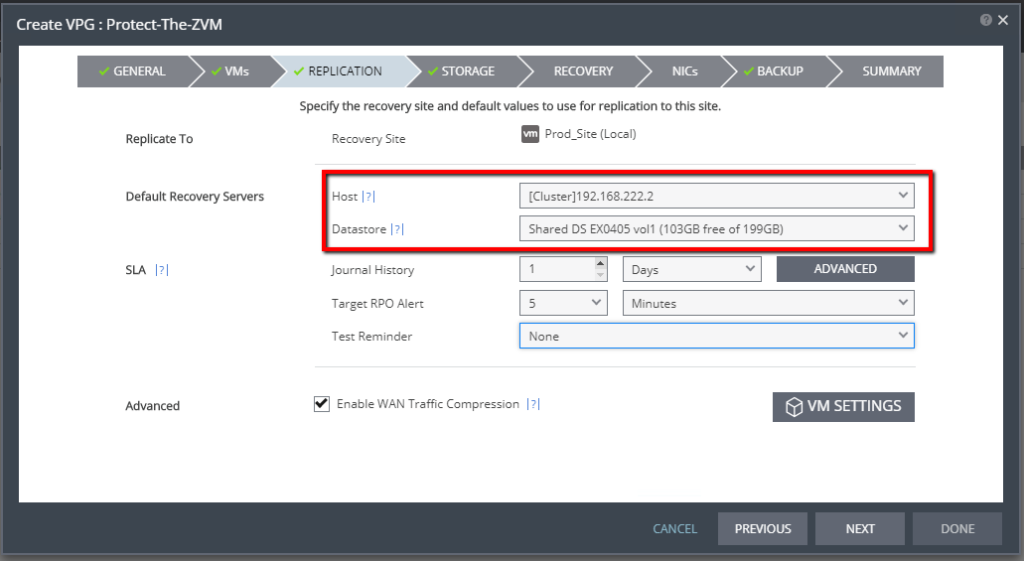
- When selecting your default recovery server for the VPG that protects the ZVM, select a host, as opposed to a cluster. This allows you to easily locate the VRA responsible for protecting the ZVM. Further on through this article, you’ll see why.
- Select a specific datastore for recovery. You can select a datastore cluster, but for the same reasons as above, selecting a specific datastore allows you to easily locate the disk files for the “recovery replica” of the ZVM in the event of a failure.
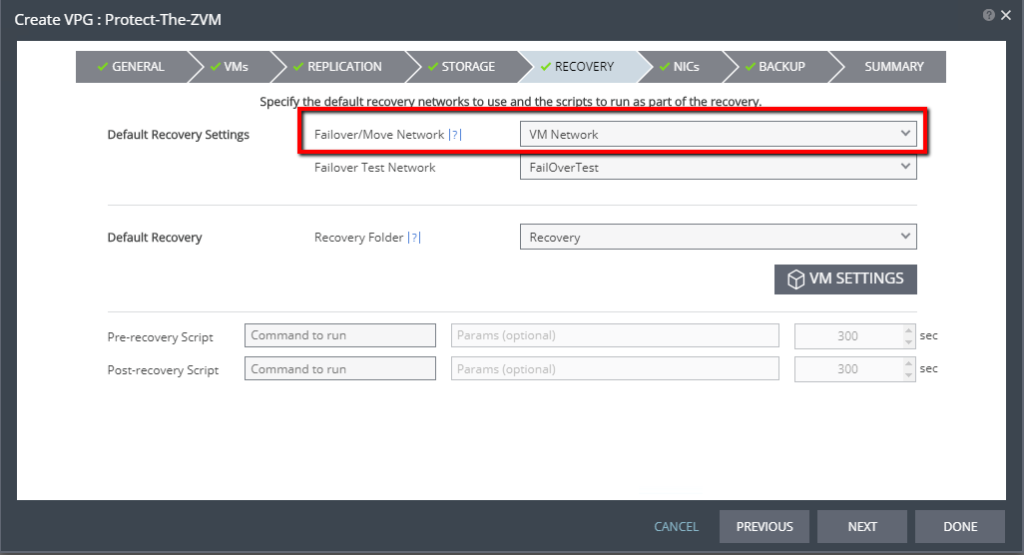
- Select the production network/portgroup that houses the production IP space for the ZVM (Recovery tab of VPG creation wizard). We will not be changing the IP address.
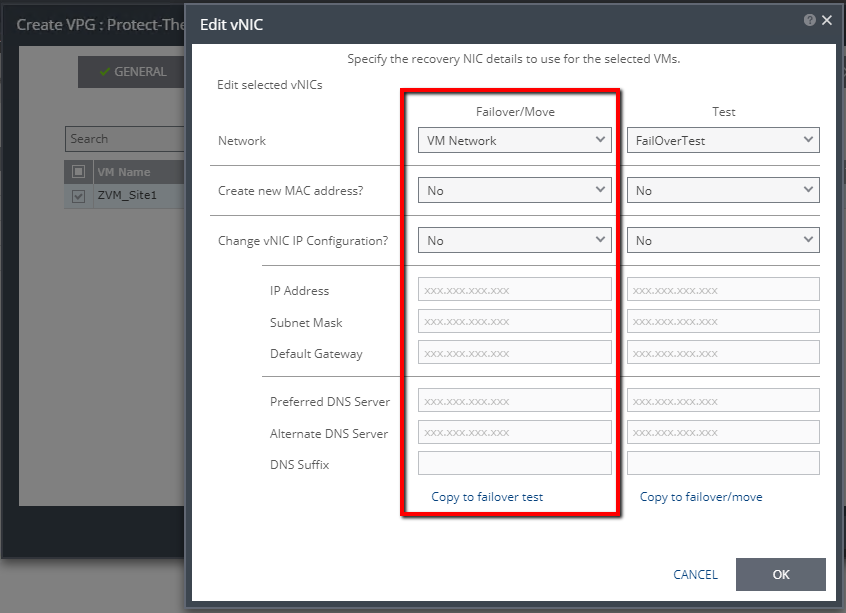
- Do not change the IP address for failover/move or test (in the NICs tab of the VPG creation wizard).
Once you’ve created the VPG, allow initial sync to complete. As you can see below, I now have a VPG containing the ZVM. Please note that I’m protecting only the ZVM because I am using the embedded SQL CE database. Using an external SQL server for the ZVR database will require additional planning. Once initial sync has been completed, you’re ready to begin the actual failure test and recovery.

Simulate a Failure of the Primary ZVM
In order to test the recovery, we will need to simulate a failure of the Primary ZVM.
- Power off the ZVM. Optionally, you can also go as far as deleting it from disk. Now you know there’s no coming back from that scenario. The ZVM will be gone.
Recover the ZVM Using the Replica
If you remember form the blog post linked at the beginning of this one, even if the ZVM is down, the VRAs are still replicating data. Knowing that, the VRA in the recovery site (in this case on the recovery host) will have a lock on the VMDK(s) for the ZVM. That is why I mentioned it would be good to know what host you’re replicating the ZVM to.
- IMPORTANT: Before you can start recovering, you will need to shutdown the VRA on the host specified for recovery. Doing so will ensure that any lock on the VMDK(s) for the replica will be released.
- Once the VRA has been shutdown, open the datastore browser and move or copy the VMDK(s) out of the VRA folder to another folder. By doing this, you’re making sure that if that VRA comes back up before you can delete the VPG protecting the ZVM, there will not be a conflict/lock. If you select to copy the files, rather than move them, then you can use the existing replica as a pre-seed to re-protect the ZVM.
- Create a new VM using the vSphere client.
- Select to create a Custom virtual machine.
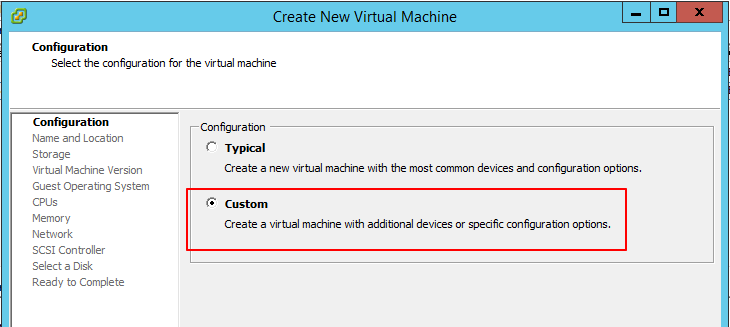
- Provide a name for the VM that doesn’t already exist in vCenter if you did not delete the original “failed” ZVM. This ensures there won’t be a naming conflict.
- Select the datastore where you copied the replica VMDK(s) to.
- Select the Virtual Machine Version. In this case, you can leave the default, which will be the latest version supported by vSphere version.
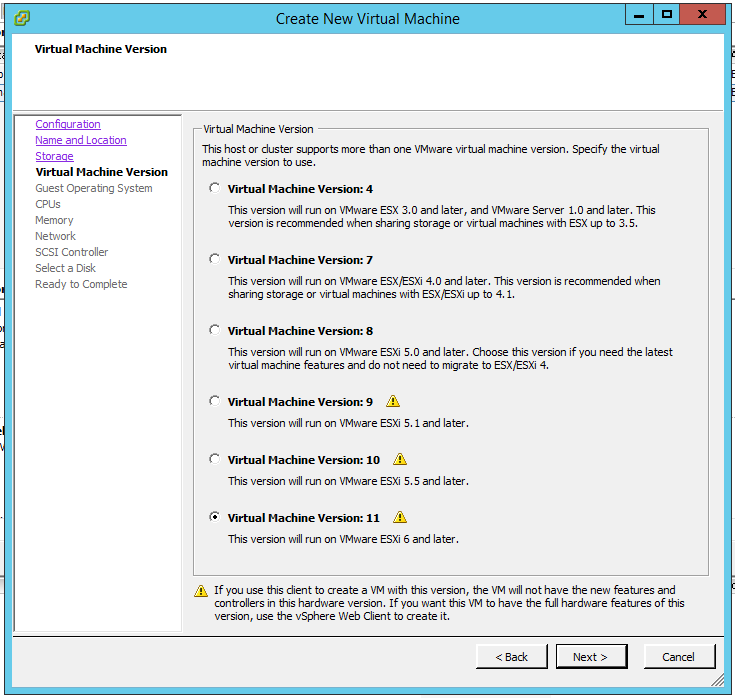
- Select the OS version for the ZVM.
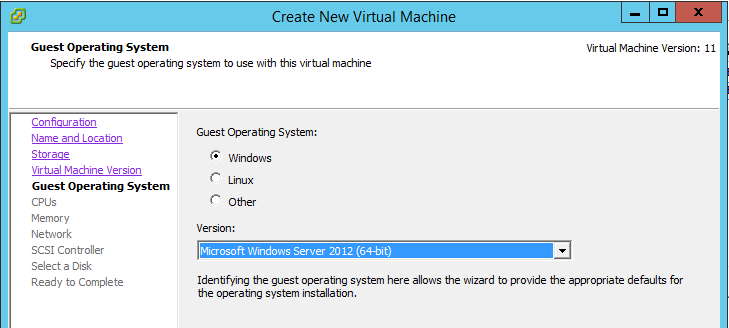
- Select the number of vCPUs required. (Match what the original ZVM had)
- Select the amount of memory to allocate to the VM. (Match what the original ZVM had)
- Select the PortGroup and Adapter type and make sure it’s set to connect at power on. This should match the original. My original ZVM had been configured with VMXNET3, so that’s what I selected.
- Select the SCSI controller to use. Again, try to match the original. Mine was LSI Logic SAS.
- On the Select a Disk screen, select Use an existing virtual disk.
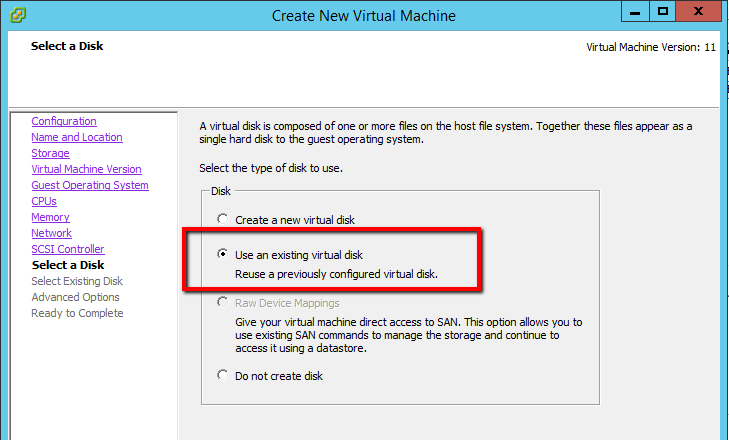
- Browse to the location of the ZVM replica’s VMDK(s) you copied, and select the disk and click OK.
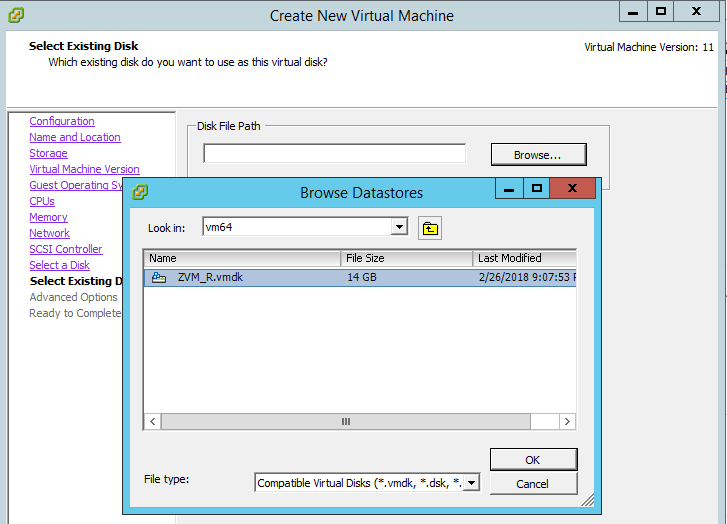
- Leave the advanced options at default.
- On the summary screen, click Finish.
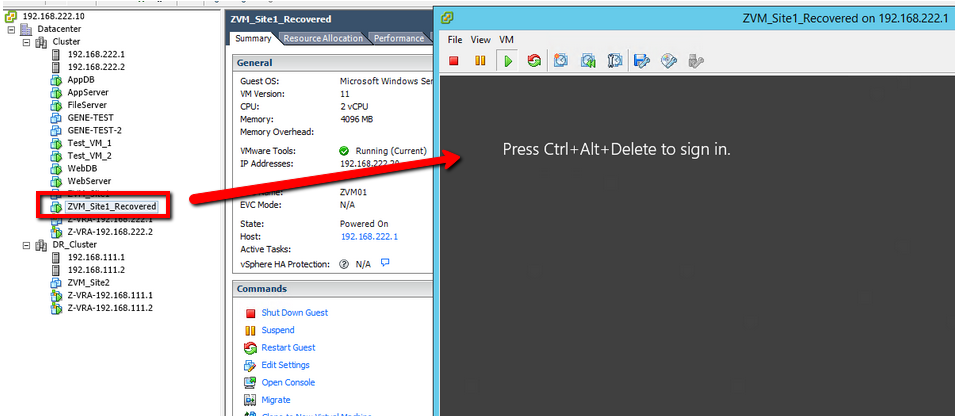
- When the creation is completed, power on the VM, open the console, and watch it boot up. At this point, DO NOT power on the VRA that you previously shutdown. There will be some cleanup, especially if you did not copy the VMDK(s) to another location.
Clean-up
Once the recovered ZVM has booted up, go ahead and log in to the Zerto UI. Don’t be alarmed that everything is red. This is because the ZVM is coming up from being down for a while, and it needs to run some checks, and get re-situated with the VRAs and begin creating new checkpoints again. Once that process completes, as we saw in the previous blog article (referenced at the beginning of this one), things will start to go green and into a “Meeting SLA” state.
- Click on the VPGs tab.
- Locate the VPG previously created to protect the ZVM, and delete it. If you want to retain the original replica disks as a pre-seed, make sure you select the checkbox labeled Keep the recovery disks at the peer site. Please note that because the VRA that was protecting this VPG is still down, you may need to click delete again, and force the deletion of the VPG.
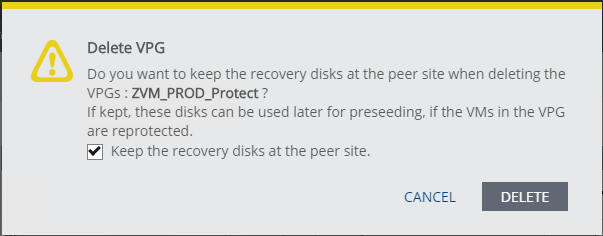
- Once the VPG is deleted, go ahead and power on the VRA you previously shutdown.
Verify ZVR Functionality
Now that we’ve cleaned up and powered the VRA back up, you can verify that ZVR is working again, and the ZVM is performing its duty of creating and tracking checkpoints in the journal again. You can do this by starting to initiate a failover test and clicking to see what checkpoints are available, or by attempting to recover a file from the journal from any one of the VPGs.
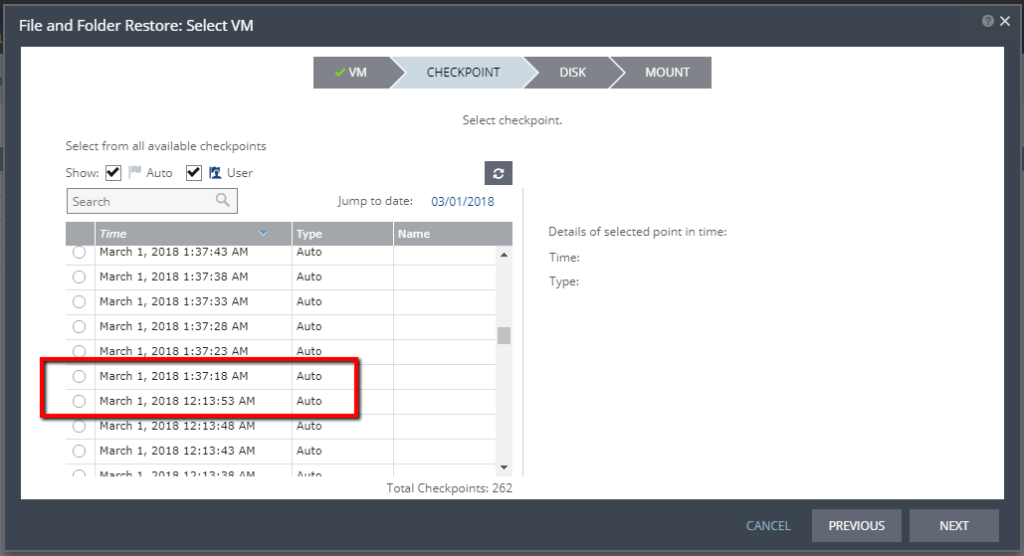
(Above) you can see when the ZVM went down, and when it started creating and tracking checkpoints again.
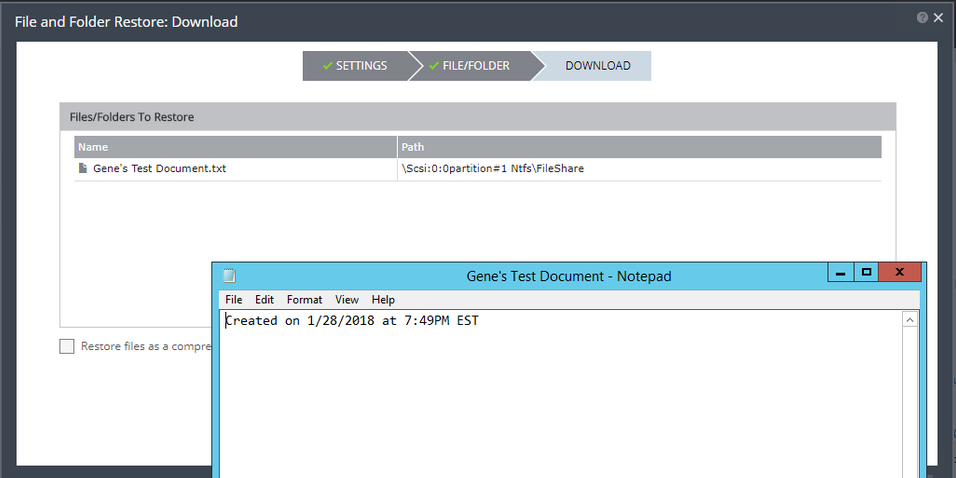
(Above) Restored a file from the Journal.
Summary
While this is not an optimal/recommended configuration, through testing and validation, we have seen that even in a single ZVM, single vCenter environment, being able to recovery the platform that is providing your resiliency services is completely possible. Granted, there will be some data loss (RPO) on the ZVM itself, despite being down for time between the failure and the recovery, Zerto Virtual Replication is clearly able to pick up where it left off, and resume protection of your environment.
If you found this to be useful, please share, comment, and let me if you’ve tried this for yourself!
